Quantcast
Channel: The Valley Woodworker
Viewing all 377 articles
Browse latest View live

Yard works

$
0
0
You probably noticed that there isn't much woodworking related posts lately...

I am a full time nurse these days.

Still, with friends help I am able to take care of small stuff around the home.
With the sun getting stronger every day, she has expressed an interest in going out on the back porch to take it in.
That means time to get into the backyard shed....

But before I go in, I need to take care of a broken tree in front of it.
And thankfully Rudy recently graduated from twigs to small branches, so he is rearing to help :-)

Earlier in the year we had freezing ice/snow and high winds damages.
That white birch tree by the porch has recovered... some 

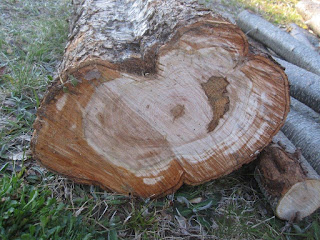
The cherry tree by the backyard shed has lost two trunks.
It need to go before I can get in the shed 


So, Rudy and I went out to cut down the two trunks hanging down in front of the shed.

Notice the accumulation of dirt inside the trunk, 
there was not much solid wood holding these two trunks

You can see where I cut, there was not much wood left holding it.

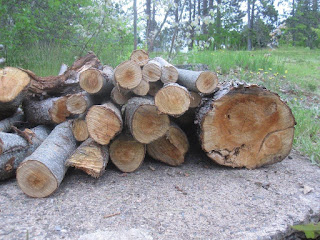
The two removed trunks.

With these out of the way, I was able to retrieved the deck furniture.

I think this tree will have to come down, I'm not sure
 it would survive much longer with that big scar.

Whenever I cut it down, I will try to salvage some wood to make something out of it. I'm certainly not expecting much board foot out of it, but should be able to get some piece to turn or carve.

When I went in, I noticed that the roof on the right hand side part as sprung a leak. About three years ago I looked into putting on a new roof and siding, but after pricing the work required, decided against it and just fixed it and repainted it, intending to built a new one down the road.  That point is coming soon...

We did not had a bad winter this year, as opposed to the never ending one last year. But the freezing rain and high gusts of wind took their toll on both the shed and deck.  Similarly, 4 years ago, I decided to just fixed the deck instead of replacing it for now.  It too would have to be replaced in the near future...

At the time we bought the house in 2011, we knew from the inspection that the deck needed some attention. The ledger board was rotting and attached to the house by rusting away spikes. We simply temporarily support it in order to detach it and replaced the ledger board  .

This is how we pulled the deck away from the house, 
while being supported in order to replaced the ledger board.

New pressure treated ledger board installed in two sections, 
lag bolted to the house and flashed

Once that was done, some of the worst damaged or 
rotten deck boards were replaced. 
Additional support added to the understructure.

And a bunch of new parts were made to solidify the railings

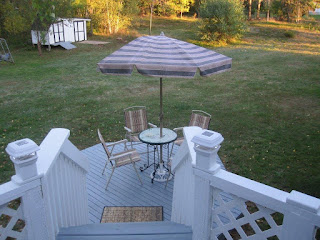
The final look in 2013. Safe and sturdy for a few more years
 before being replaced.


That was to buy us a few more years before being replaced, its time is coming soon, it too suffered damages this winter. Not sure yet what I will replaced it with, but the back yard is in need of landscaping, so I will tackle it at the same time. Something bigger for sure and probably multi levels (?)

This morning we had a short visit from her cousin Cathy in New Brunswick, they arrived yesterday. Cathy and her husband Maurice came with their little dog, Mike. As always, it is comforting to have loved ones visiting but the goodbyes take on a different meaning...

Time is marching on inexorably... :-(

Bob, with a lump in his throat

Care package from thoughtful friends

$
0
0
We recently had visits from the Ottawa region's friends.
Wendy came for a week in the valley visiting family and friends and later her husband Claude came last weekend, from Halifax where he was working for the Navy.

During both visits, they mentioned that they had a couple planes they want to bring me, but forgot.
Received a package in the mail the other day containing both and a thoughtful note from Wendy
Thank you guys... Love you.

Rudy trying to help ???

Interesting specimen, never seen those before.
A small palm block plane and a No 4 smooth plane that has a strong European look, judging by the shape of the front knob.


What really surprised me is the form of that No 4, it has lots of the characteristics of an older Stanley design... (Stanley types dates shown are for the introduction of a given features)

Good old flat surface frog bedding area, my favorites

Adjust. nut has a recess (Stanley type 3, 1872-1873) 

Flat frog bottom (Stanley Type 4, 1874-1884)

Why you should always remove the frog on an older plane.
I always find wood chips etc which if left alone will cause rust. 

Cleaned up we can clearly see the frog receiver machined area.
These will need to be touched up lightly with a file

The four major change to the frog receiver on Stanleys

My frog look like something in between the second and third from the left on the above picture. The flat receiver came in 1874 then modified in 1888 by casting two ribs (like I have) The next big changes came in 1902, even less machining and a central rib to keep  the frog centered when adjusting with a screw in the back. At that time according to Patrick, the patents covering the earlier frog design had just expired and Stanley needed something else to distinguished themselves from the competition. 

Look like my specimen was made post 1902 but could not infringed on Stanley by adding the central rib and screw adjustment. My best guess at this time is from the 1920-30s

The bottom surface is painted  (japanned?) and rusty, paint is bubbling.
Will need a good filing.

Flattened area on top of frog (Stanley type 5, 1885-1888) 

One piece lateral lever (Stanley Type 5, 1885-1888)

Key hole lever cap, recessed back (Stanley type 3, 1872-1873) 
Rectangular spring (Stanley type 2, 1869-1872) 

The finishing before the nickel plating is kinda rough in places.
Not to the usual Stanley standards, but perfectly serviceable.

Cutter nut fit perfectly my LV screwdriver

Good length and not serious rust, will clean easily.

Interestingly, the cap iron (chip breaker) is not as wide as the blade...

Small stained hardwood handle showing signs of proper uses.

Fit my hand with those wear points perfectly

I did not uncovered any markings yet, but until found otherwise, I will assumed that it is from Germany.
I will have to ask them the story or provenance of these two planes.

The other one is a palm block plane, also without any discern able markings (?)

Solid casting, strange looking cap

At first I thought it was made like that to produce three contact points...

But on close inspection, it has obviously had its corner broken 
and a small piece at the top

Strange cover, makes adjusting the plane ...tricky??

The top of the blade shows evidences (filed away) of mushrooming, 
by repeated hit from a metal hammer used to "adjust" it.

Typical block plane frog, only two contact point, the flat band 
at the front of the mouth and in the rear on the post.

The problem often encountered with this design.
Take a good look where the screw is used to secured the blade.
If you screw it down too tight you will bend the blade up at the ends and it will choke quickly... if it still cuts.

In case you were wondering, YES, some of these designs have the screw post co planar with the mouth and rear post, avoiding that problem, but... more complex, more machining, more money and bla bla...

All in all two very interesting specimens of which I never seen before.
The No 4 got me the most excited. It has all the good bones to becomes a very good performer after some fettling.

Thank you Wendy and Claude :-)

And if you are wondering why on earth would I need yet more planes... It's because I'm putting together two kits plus mine remember?
Besides I love studying and researching old tools, you never know what you would encountered...

Bob, getting side tracked, yet again ...Squirrel! :-)

Understanding Type study's

$
0
0
Hand tools, unlike most power tools, do not have any serial numbers or other distinctive markings to help dated a tool

Among collectors, in an effort to help date or more correctly narrow down to a more specific time period a given tool, for years now, they have come up with Type studies.

WHAT ARE TYPE STUDY

They are the results of examining numerous examples in order to group various distinctive changes or features into categories (Type) then trying to attach specific dates as to when such changes or features took place in the tool long history of production.

PROBLEMS WITH TYPE STUDIES

Most of the current type study we see today were developed before a little thing like EBay came into being.  Suddenly, as numerous examples came to the front it had a ripple effect on type studies, price list, rarity and etc.
Some tools that were thought to be rare became more common once the collecting of tools started to become more trendy in the last decade or so and more of them became available thru sites like EBay.

Along with the larger quantity of tools being available, new features and changes became apparent Type studies had to be updated to reflect this.

Adding to the confusion is the fact that relying on catalog and advertising copies in magazines and such is often misleading because companies recycled their "wood cut" (carved block, inked to print tools outlines and such) throughout numerous years. Millers Falls for one was notorious for that, but so was Stanley and al...

You also have to realized that at the time all these tools were produced, their manufacturers had no idea that someone would be trying to pin point a date of manufacture by the various features down the road.  In addition they would used up their inventory of parts as they went. Therefore not all the tools came out with the same parts during the in-between time periods.

And then we have a more modern phenomena, since a lot of these tools are now being restored to be users, some parts are replaced to make them functional or replace missing parts and etc. The cutter blades being used up eventually are often found replaced for example.

In addition since tool collecting has become quite popular, with an increase in prices (they are after all in a limited supply) Some unscrupulous vendors will change parts or modify them to pass as more collectible and rare "types".

One of the most commonly referred Type study is probably the one covering the Stanley bench plane No 4.
It is often used indiscriminately across the whole bench planes models No 1 to 8


There are of course some caveat to doing this:
The No 1 was in short lived production and because of its diminutive size, did not had all the "new features". For example they never had corrugated sole.
It does have its own Type study BTW

The No 2 to 8, similarly, did not had all the features of the No 4, and to add confusion to the unwary, it was based strictly on the Made in USA models.

Stanley also produced most of these bench planes in Canada, England,  Australia and possibly Germany (?)
Again, not all of these will "fit" the American type studies.
All that to say, Type studies should be used with a grain of salt and not as the absolute definitive answers.

Are they still relevant? YES, as long as their limitations and usage is understood.

I will share with you my own Type studies features that I compiled thru the years with pictures (mostly collected off EBay) whenever time permits.

I did this years ago to make sense of all the sometimes confusing descriptions of the features in question.

First I must dig them out of my computer backups then clean them and "massage" them as time permit

I am currently pretty well on full time nurse duty right now.
But not to worry I have lots of support at home, from the palliative care nurses, doctors, home support workers and of course our numerous friends.

Stay tuned.

Bob, dusting his old files while waiting for Rudy to finish his "beautification program" (doggy grooming :-)

God speed Heather...

$
0
0
After a long battle with cancer(s), the love of my life slipped away peacefully at home surrounded by family. She hurt no more and she is now an angel.


1954-2016

We have been together thru thick and thin, both battled cancers and various serious illness, but thru it all there was never any questions about supporting and being there for each other.  To us "I do" truly meant for better and for worse.

We dream together, laugh and cry together, and supported each other passions as only a loving couple can.


I will sorely miss her smile that told me everything is all right, we will get thru this together, one more time. Her sense of humour and playfulness, but above all her unconditional love and support.


Rest in peace my love, I Love you. Always did, always will.


You are now in good company, with lots of your favorite musicians, enjoy the party.

Until we meet again, I'll be thinking of you always....


Bob, who miss you already but comforted by the two wonderful children you left behind and your little bundle of joy, Rudy.

Heather and Tim, our oldest

Rachel, the best thing that ever happened to Tim, Heather and Tim

Heather and Matt
Matt, our youngest

Heather and Rudy, the baby


Do not stand at my grave and weep.

I am not there; I do not sleep.
I am a thousand winds that blow.
I am the diamond glints on snow.
I am the sunlight on ripened grain,
I am gentle autumn rain.
When you awaken in the morning's hush
I am the swift uplifting rush
Of quiet birds in circled flight.
I am the soft stars that shine at night.
Do not stand at my grave and cry;
I am not there; I did not die. 


Thank you

$
0
0
Life is slowly going back to some sort of normalcy.
I am humbled by the responses from my readership of this blog.
My last entry on Heather is by far the most viewed blog posts, it is comforting to know that a small part of her life legacy has been read around the world.

I am also very thankful to the wonderful staff at Middleton Funeral home 
who allowed Rudy to be a part of her service. I am sure it will help him get some closure as well.

African Violets were front and center at her service, as they were such a big part of her life. A big thank you to her friends at both Annapolis Valley African Violets Society and First Halifax African Violet Society for the beautiful violets provided.

To the staff of the Victoria Order of Nurses (VON), the palliative care team, our family doctor, Dr Drysdale and his staff, the Royal Canadian Legion Branch 98 and all the friends that pitch in with help and support: A huge thank you, we would never been able to keep her at home as per her wishes till the end without you.

So what is next ? I have a few more projects on the back burner for the shop;
A proper bottom cabinet for my antique tool chest, a boring till of some sort, another style of saw bench and possibly a bigger work bench... down the road.

Meanwhile, there would be life's celebration of Heather taking places here, in Halifax and later in Ottawa, which Rudy and I would attend.

Heather and I being goofy, 2004

Next posts would be back on woodworking.
Again I thank you for your support

Bob and Rudy, helping each other getting thru this.

Doldrums...

$
0
0
I still got lots of executor stuff to complete but in the mean time I try to keep myself occupied... To me that often meant, go find tools... Hours of distractions ahead, researching and evaluating my objects of desires AKA my new lumps of rust :-)

As the weather is finally showing strong hints of cooperation, the yard sales are starting to sprout along with my usual local tool enablers new inventory...

Well... so in between trips to and from, I brake for yard sales that appears promising for tools, I quickly scanned Kijjiji ads and visited my local haunts.

So today in my trip with Rudy to the city, to pick up yet another...gasp... miter box :-)

Rudy checking the loot we brought back

The saw has an etch on it. It is a monster 27in + (probably a 28)
X 4 in and 5/8 (was probably a full 5 in new) 

Only apology is the small curlie at the bottom of the handle is cracked.
 Easy fix.

Yes it is a Disston

And here is why I just had to have it... It is the elusive MF Langdon No 24 :-)


I did a few pit stops at LV and Busy Bee. Also scored another Kijjiji find, a Yankee No 135A complete in the box with instruction sheet and spare bits.
Yah, I know, I don't need another one... except...


Also recently pick up a old Millers Falls No 12 Breast drill, a couple of Jorgensen hand clamps and a rarely seen AH Reid pushdrill model.

She has been degunked, had a quick bath in Evaporust and sprayed with WD-40,.
Ready for storage until she comes back for a final clean/tune-up.

I got two of these for $10

Here is something seldom seen. if you google AH Reid push drill you will come up with the more often encountered low knob design

I have yet to see one without this splitting crack on the spindle.
The usual repair found, is to wrap a string or wire around it. 
Perfectly serviceable.


That No 12 drill took a lot of my Evaporust so I bought a big jug this time, I have a few things cueing up in the line for a bath in it.


I meant to build a proper turning saw ever since Gramercy put out their kits, finally got around to buy it, a project for later.


Finally as I was moving around the Lagdon mitre box it occur to me that for its diminutive size (the No 24 is a small one) it is very heavy!!! No cast aluminum on this bad boy, all cast iron and steel.

In case you are wondering, it is missing both adj depth stop and 
the front post is missing its sliding plate.

Heavy casting, weigh a few pounds...

That should keep me occupied for a little while: Research, evaluation, clean up, re-hab, looking up parts, sharpening etc...
Its a good thing.

Never cease to amazed me what I can unearth locally....

Bob, sipping wine, updating tool's files.

Boring tools storage requirements

$
0
0
OK, I got my planes and saws looked after, now all I need is to come up with some sort of boring tools storage. What? Another boring till ? :-) "Well actually" I swear those were our youngest son Matt's first words :-)
I need two, another one for the power tool shop.

Frankly, I do not know yet what it is going to look like, but as usual let's first round up the usual suspects.


Then google woodworking brace storage and found these on Pinterest


which lead me to this blog

I like the look of it but definitively too small for my need
But I think I can use that as a starting point.

Lets see what I intend to store
From bigger to smaller

Hand augers; These are the large twist bits on steroids used with a T- handle
Do I need these? No, they are mostly decorative I suppose.


Beam boring machine: A sit down drill press.

Braces: Wooden and metallic. The original cordless drill, hold its charge forever :-)
My all time favorite is my Fray or Spofford metal brace, its chuck handle every shape of shank bits I can throw at it, securely. Sturdy and reliable.

A short selection of brace types to incorporate.
Perhaps 4 metallic brace of various sweeps?

Breast drills: The manly hand drills

Just happened to come across this MF No 112 breast drill this morning.
So now I have an older No 12 and a newer No 112.
Granted I do not need three but...

Handrills: The ubiquitous Millers-Falls usual suspects and one Stanley ...

Second from left is  a Stanley No 626 that I picked up this AM.
It followed me home with the No 112 :-)

Push drills: From Yankee styles down to the small jeweler's type


Gimlets and awls:


Various accessories for braces and drilling in general:
Spoke pointer, Hollow bit (These work together, so should remain together) depth stops, a large assortment of various bits etc. the bits will vary between the power tool drill cabinet and the hand tool room one.

Hand tool room:
Irwin, Jennings, Center bits, small assortment of brad bits for handrills
The cordless drill and Impact driver will also reside in the hand tool shop

Power tool room:
Twist bits, Brad bits, Forstner bits, Hole saws bits, small sanding drums kit.
Corded drills etc.

Not sure where such an animal of a cabinet will reside, I'm quickly running out of room on my bench wall...hummm I need bigger walls :-)

The space I plan on using is between the window and the power panel

Tried this holder to check the size required for various tools:

It holds push drills fine

Hand drills and breast drills fits

So does small push type drills.

So I guess I can start with that size holes to figured out my holding strategies.
I will then mock up holders to figured out my optimum spacing on a piece of cardboard to figured out my till size required.

And while I am starting to plan these small (?) tills, I also want to get starting in earnest on the bottom chest for my tool chest, and I have other small projects on the horizon with my son Matt, and there is a myriads of small things left to finish around the shop...

So I am probably going to be alternating back and forth between these as time permits. My biggest problems right now are my knees. My left one is giving me fits and the stairs to from the basement shop is no fun :-(
I have recently been diagnosed with severe Arthritis in both knees, so that makes me officially old I guess...
I should not be surprised, it is the typical lot of an ex-serviceman, lower back and knees shot. Man was never designed to carry umpteen pounds of gear on his back for long distances. Thankfully I was Airforce, only did that sort of silliness part time, my Army buddies gets it much worse, they also jumps from a perfectly serviceable aircraft with all their gears on, me I just land with the plane thank you very much  and I never had to eject :-)

Bob, planning his last major projects in his ongoing shop re-organisation... I think? Oh and perhaps a bigger bench down the road?? Now where is my Voltaren??


Boring till preliminary design

$
0
0
Today is a slow day, catching up on yard works and etc...
Rudy is so much help...NOT! :-)

Anyway, figured out my max space available, about 25 in external dimensions, in order to fit between the window and the service entrance. The height? Not sure yet.

So armed with a piece of cardboard cut 25 X 27 in, I try some layouts, to get a feel for the space it occupied.

I'm thinking put the braces and hand drills on the top row
and the pushdrills etc in front.

Depending on the depth of this box I could possibly add one more row at the bottom of the cabinet for small accessories, specialty bits etc.
Deeper yet and I could add the bits on small hinged doors in front of the braces and handrills?

Did some figuring out with my sample holder to guesstimate the spacing's

At about 25 wide (outside dimensions) I can put in 11, one inch diameter holes spaced at 2 inches, for the handrills and push drills.

The holes spacing for the braces works out at 7, one inch and 1/8 hole spaced at 3-1/2 in.

Figured out my optimum spacings, or did I ?


Quick work at the drill press and bandsaw, turned my two scrap boards into holders. Could not reach in for the last cut with bandsaw...

Braces, work great, good spacing.

Push drills etc, no problems, room for my big paws.

Hand drills...Not so much. Definitively too cramped

And the one inch holes are too big for some.

So obviously need to re-think my handrills holders. Need more space and a better way of holding them. Maybe from the handles?

Getting there, still don't have the final dimensions, but I can visualize how it is going to fit in my space and roughly what it will eventually hold inside.
And from my experiments look like I will be taller than 27 inches, as per my cardboard template.
Must also finalized what tools I am going to put in there.... YES, I have a "few" more to pick from :-)

And then there are the few that will not make it inside this cabinet:
The hand augers, and perhaps the breast drills (?).
The barn beam boring machine will obviously not reside inside such a till, but some of its accessories could, bits, wrench etc.
BTW, I did found a proper bit for it :-)


Not sure yet if I want to bother putting the bits selection inside of this boring till or somewhere else. For now will go with the notion of putting the drilling bits in a separate storage solution.

Bob, trying different layouts on the floor with Rudy helping or interfering??


Boring till design set...

$
0
0
... In Jello.

Today I was planing on checking off a few more boxes on my executor's to do list, but I forgot...Today is a holiday, Victoria day, sooo banks are closed, government offices and  post office, so much for that! When you are retired every weekend is a long weekend, so...I don't pay much attention to "holidays"

Took Rudy out for a drive nonetheless and he got to sniff out the
base woodshop :-) I put in for a supervisor shift this coming Wednesday.

The more I thought about Stefan suggestion, holding the hand drills by their chucks not the doggy treats part :-)
The more I think it would be better for easier access/retrieval

So hanging from their chucks it is. Only thing is they all have various chucks sizes an clearances under, so it would look like they are going to have dedicated locations. Similarly, the only brace which would not fit into my brace holder is my English plated brace, so it would also necessitated a dedicated spot.

My only hand drill which will not hang by its chuck is my MF Buck Rogers one, its chuck is not bigger than the body. Would require a different strategy to hang in there.

Rudy leaving the scene...What no more treats? 
I'm going to chew on your shoes or something!

Since I need to increase my spacing's for the hand drills, I will have to seriously give some thought to which ones to store in there, since that reduces my available space. And the more I thought about putting the bits on hinged panels in front of them, the more I don't like it since that would negate seeing my drills in the open, which is after all one of the main design consideration for my open tills storage.

Yes, I know, open storage is bad for rust but I want to see my tools, some have been tucked away in boxes far too long, I want to see them!

The highlite of my days is to relax with a cold one while admiring my tools in the late evenings, so there! Besides being a handtools only shop, I'm not too worry about sawdust, I mostly makes wood shavings and chips. I will concede however that you cannot avoid some dust  and yes, I have to dust my tools once in a while. But since the whole idea is to rotate them in and out of long term storage, they get handled enough to spot the dust before it causes any damages.
So think what you want, I'm sticking with open storage... Just realized that it does have this drawback. I thought however to cover them with a drop clothe if/when I'm going away for a period of time on travel.

Another drawback is, if I customize too much the holders for specific tools, It negate being able to rotated them easily in and out of storage when their turn to come out to play has arrived.

So in the end, I'm balancing the aesthetic look with practicality. This will determine my final dimensions required. I also need a bit more than 27 inches high as figured out with my template and the depth would be 6 inches.

BTW in yesterday post I talk about my template being 27 in wide by 25 in high, it is more correctly 25 wide X 27 in high! I went back and corrected that post.
Somehow I transplanted these numbers but I did labelled the up part correctly on my cardboard template, so I did in fact play along the right dimensions with my tools layout.

My final outside dimensions are then:
A rectangular box, 25 in width X  30 in high X 6 in deep

I now need to finalize my holder's muck up strategies, while I go ahead and start machining my side pieces, joinery would of course be dovetailed. The holders would simply be screwed in from the back (plywood).

At the bottom of the till, there would be two rows of holder, the rear one, standing higher, would hold push drills etc, the front one will hold small bits and accessories.

So here is a preliminary look at what I have in minds. Mind(s) ?? Yes, in both my military and civilian minds :-)

Drawn not to scale and will contain more tools :-)
Yes, those braces would appears to be Rudy sizes :-)

The way I look at this shop re-organization effort, once complete, if a tool does not fit in the wall in front of my bench (in my various tills) I probably have no need for it... or very rarely. That wall of tools (Tm) contains more than enough tools :-)... Oh and that leave three more walls (insert biggest grin here)

Bob and his Amazing Technicolor Dreamcoat workshop, where tools appears magically out of nowhere to be displayed :-)


Hold the press...

$
0
0
Just when I thought my jello was firming up, I had a brain fart!

I thought it would be nice to incorporate at least one breast drill into it.
Well that monstrosity is taking lots of room, so no problem, we will just "stretch" the box taller if required...

All-right Buster, Stefan said there would be treats involved

So where are they??

I find that sometimes, what seems like a bright idea after a few pints, turned out no so great in the morning with coffee... Humm, maybe I need stronger coffee??

So following Stefan's advice, I got Rudy his treats... 
To save the tools from being munched on :-)
Now that new layout is about 4 feet long.

4ft mark hit just under my current pegboard.
That is a tad bigger that I was first envisioning...

Lets be sure to leave room for my monkey Dad!

See it fit right in there.

Since I solved your dilemma, I think I deserve one more treat...

Sooo, I think I will split this till in two parts, first one holding only Breast drill (1), braces (4), handrills (5).
The remainders, pushdrills and small accessories will go into another smaller one mounted in front of the bench, under the window. That means re-organizing that area, yet one more time... I could also organize/displays my brace bits and etc in that area.

But at any rate, I am impatient (who me?) so tomorrow during my supervisor's shift on the base, I'm cutting my pieces for my re-re-revised boring till.

Bob, designing on the fly with inputs from Rudy.  Must find a better place for Rudy's monkey...

Boring till pieces machined

$
0
0
Wednesday, I managed to make a dent in my to do list.
Yes fans, even after a love's one passed away, the Honey do list is still in effect :-)
One of these resulted in a bureaucratic catch 22.
We had everything listed as co-owner, so I had to changed the car's title.
But as soon as I declared her dead, I now have to change the plate on my car, if I want to drive away from here..... So I figure if I must changed plates may as well get veteran plates, but hold on sport fans, that require being vetted by the Royal Canadian Legion (of which I am a member) but that won't happen right now, so I got regular plates on, to be replaced by my vet plates once authorized, and getting a refund for the unused portion of the old plate I shared with Heather ..... Allright, what I thought would be a short visit at my local Provincial government office took a bit more time than I thought... Then a few more hours at the local Federal government office

After checking on Rudy, who was spending time with his doggy friends at a friend's place, it was time to start my shift at the wood shop. A quick stop home to gather my dimensions, off I went to the base woodshop.  In no time I had the pieces machined to make my till frame.

The four side pieces machined and the remainder of the board I bought.

That of course would be dovetailed by hand.
NO I did not took Rudy in the shop, way too noisy and dangerous for him.

Back home, with Rudy, I tried two pieces on the wall for sizing, it fit, just, above the pegboard in place, but I am pretty sure that area under the window is going to be modified shortly... :-)

This is how a 32 in piece fit.
And that is as big as I wanna get.
I may still shave off an inch or two,,,

Thursday
More stuff picked away at my list, mostly stuff I could not do at the local Federal government office, they apparently don't talk to the tax dept and passport office etc ???
These you do on line or via old fashion phone with muzak on hold for eons............your call is important to us, please stay on the line in order not to loose your priority in the cue... Zzzzzzzzzz

After tweaking my pieces to my final, final, final dimensions. Who me keep changing my mind !??
It was quick work dovetailing a 6 in wide box.
Then come the fun part...
Finalize my holders.  That of course would imply that I settled down which ones are going where.
Hummm, still don't want to customized the holders too much to specific tools, but regardless these holders are to be simply screw in from the back, so I can further customize down the road :-)

Had the car in for tire changes, 2 new ones, somehow they got the wrong sizes in ?? They will called me back tomorrow when the right size comes in...
Then Monday back to the dealership to have my suspension rebuilt. That darn pot hole from hell I hit in Boston last year sure took its toll on the car, so far I replaced two tires, both front spring, now replacing the last two tires and the shock absorbers. They say they still OK, but they are getting long in the tooth, so may as well replace them and see if there is anymore damages, four wheels alignments and check my AC, it doesn't seems to be very cold anymore, recharge?
All that to get the car ship shape for travelling this summer, with Rudy
.
There goes a big hole in my tool budget :-(

Bob, making small progress on many fronts

Rudy fashion show

$
0
0
At  Stefan and more of my reader's requests, here is a short pictorial post on Rudy various outfits.

You will note that Rudy and I shared some matching outfits, that is no accident, that was my wife sense of humour :-)

Rudy is a Chinese Crested hairless and as such he need protection from both the cold and the sun, hence why he is always wearing a shirt then dress appropriately for the weather, raincoat, jacket, parka etc.

His first outfit was his little Elvis jacket han han han

He was 4 months old when we first got him.
He has long outgrown it.

His all time favourite toy, his stuffed monkey

His next outfit was a pink shirt with the logo "BTW I have to download". 
It was the only shirt I found around here that fit him. That may have been the start of a trend of finding matching outfits :-)


Heather and her baby companion


This past January I got permission to bring him in the hospital to see her.
Just in time, by the time I had all the paperwork's required she was discharged the next day...

Then found another shirt locally, a grey one this time.


Although his shirt is clearly labelled "The boss" I don't think that Matt's cats 
are able to read, because the cats ran the show at Christmas :-)

At Christmas Heather got a gift card for Amazon.com, courtesy of Ralph's wife Diane. She could not spend it at Amazon.ca so had to find something that they would ship here. That is where Heather found lots of Rudy's outfits: Polo shirt, Hawaiian shirt etc. Delivered straight to our door from China....

Rudy's Orange Polo shirt

Rudy's Blue Polo shirt

Rudy's green Polo shirt

Rudy's Red Polo shirt.
I don't have a matching red one in my wardrobe...


Rudy's lumberjack or Plaid shirts. I only have a matching red one...


Rudy and Heather matching stripped shirt

Rudy's California shirt

Rudy's Hawaiian shirt

Rudy's dress shirt and tie :-)

Yes, that was quite a few outfits he got from Diane :-)

He also got a Roots rain coat, courtesy of his Cousin Judy


Also, I believe, from his cousin Judy he got that Zebra jacket

Rudy's Zebra jacket, notice how he blends in the decor :-)

And from our local pet store I got him a fleece pajama and his red pooch Polar jacket.

He love this outfit.

When he has to go out, he goes and wait on his stool by the patio door.
He figured this out all my himself.
  
Rudy's Pooch Polar parka. Yes, I cleared away a path for him in the winter.

He often wear his fleece jammys under to cover his butt better


And there you go, that was Rudy's fashion show, hope you enjoyed.

Next I'll kick my ass if I have to and get myself back into the shop...
Its not for the lack of projects it is just that I cant find the motivation right now... :-(

Bob

Woden No 0110

$
0
0
A slow day today, awaiting friends to go thru Heather stuff and sort it.
This morning I took Rudy to my usual local Week End Flea market. There is often tools hidden in there.

Rudy right away spotted this little block plane, it look promising, so took a closer look.

It is a Woden No 0110, Woden (who would be merged with Record later) copy of the ubiquitous Stanley No 110.

As block planes goes, the No 110 is rather crude, but there are multitudes of versions out there by whom ever made planes.
A solid built No 110 like a vintage Stanley or Record etc. is a good performer.
It also can minimize the wear on your "other" block plane: The No 65- 1/2 or equivalent.
Similarly if your work is smaller scale a No 102 or 103 would be a good choice.

A solid, basic block plane is a very handy tool to have around the house, not just in your shop!

So once Rudy and I came back home, I did my usual treatment for a "new" lump of rust. A bunch of pics, before and after initial treatment and assess its condition. The casting is solid, there are no broken parts, the only serious defect is the pitted and worn area in front of the mouth. That's bad and will have to be lapped down below it. Thankfully, this is a good solid and thick casting made in jolly old England :-)

Here are the before (as bought) and after (after initial clean up)
And... NO... I did not paid the sticker price -)


You can see the bad area in front of the mouth in this pic. Mostly middle of the mouth wear, which is very typical.


But for now, that is sufficient to go rejoin its brethren into my plane tills and update my files etc.
The blade would also be sharpen next time it is coming up to bat and there is a nick in it.

All in all, a perfect plane to put into my son's kit.

Bob, reeking of WD-40...hummm maybe I should let the ladies go thru her closets without me... :-) 

Things on the go AKA get busy

$
0
0
When you are going thru a bout of depression... Get busy!

It's the best way I know to get thru it, been there done that. Lost a few good brother in arms thru the years, never easy, but you carry on, because that's what you have to do to survive...

Losing a love one dying slowly under your eyes is lot harder, but i'll get thru it.
I have two wonderful kids, a small doggy companion and lots of friends counting on me so Keep calm and carry on we shall.

Anyway, all this to say, I'm trying to kick up a notch my level of distractions.
And if anyone is wondering, yes, blogging help.

This past winter we did not had much snow, but lots of strong winds and freezing rain. A bad combination for trees.
I lost a tree and quite a few branches here and there.

That small cherry tree by the shed lost two trunks

Right across from my driveway, the neighbor lost a pine tree

That was in February, hence the snow, but it was not until mid April that I finally cut the broken trunks down...

I needed to clear the path in front of the shed 
in order  to get to the deck furniture.

That was quite a sizable wound and I'm worry 
about the remainder trunks, they lost a great deal of strength

  
So weeks later, I decided that the tree should come down.
That call for a chainsaw. I maybe a Galoot, but I know when to use "assistant" gas powered or otherwise :-)

My "tailed assistant'' :-)

View after cutting off all the trunks. As you see it grew
 from numerous small trunks that grew into one.
Not a very strong "main trunk" 

This is the small pile of stuff I keep

Hoping to get some good small pieces out of it

Surely there are at least a few good pen blanks in there :-)

Rudy directing where all the branches and etc should go.
Wow look at the size of some of those twigs Dad!

Good job Rudy you deserve a treat!

That was at the end of Apr, that I finally reduce the tree to a pile of branches.
I cut the grass once before, around it, but now it is grand time to clean up so I can mow the grass properly around the shed. Also needed to go thru my pile of salvaged wood, run some thru the bandsaw and stack it to dry properly.
It is a lot easier to resaw green wood than dry.

As I was typing that this morning, it dawn on me that my wood pile has been drying for a good month by now, so much for green wood...
So may as well get off my computer chair and finish that job...

Last load of branches and twigs

The wood I'm keeping is now piled on dry cement, better than in the grass.

You can really see how much it has dried already. 
Notice how it is drying from outside-in?

Rudy has declared that pile of sticks 'HIS'
by marking it. Beware other animals, that pile is mine, all mine.

Enough yard work for now, but soon, I'll tackle resawing some to see what I can get from it. Some would be turned, carved or perhaps made into small lumber pieces?? I kept a bunch of forks, not sure why yet, but :-)

You may remember that another of my shop reorganization project is to built a proper bottom cabinet for my antique joiner chest.

That small chest currently resides on a Rubbermaid container 

After banging my toes on a small chest in the basement, that we once used as a coffee table, I realized as I was hopping around on one foot cursing it, that it would probably do the job nicely.
So I dragged it down to the shop to try it. Dragged you said? Well yes, it currently is holding my vinyl collection of LP records I keep, like my original Beatles albums and etc. Heavy thing...
One of these day, I shall hook up my fancy turntable with a moving coil cartridge and a pre-pre-amp...ahhh, but I digress and my toe is still making its presence known. And I need new (old) amp and speakers, sigh!

Look at lot more dignified for that small tool chest

It is currently sitting about an inch lower than on the Rubbermaid container, but for now that will do. I'm going to experiment by putting a wheeled platform under the bottom chest and check various height till I find my ideal ''Pain free'' height. It will also let me experiment with my final dimensions.

Meanwhile I received in the mail the No 8 lever cap that Ralph sent me.
Then there was that strange sound in the background...

Pieces of bubble wrap are strewed all over the carpet

Following the traces back we find... a clue to whom may be the culprit??

Somebody left a clue behind...

My Stanley No 8, did not came with the proper lever cap and blade. It has a Record blade and a Stanley No 7 lever cap.

Record No 8 blade

No 7 versus No 8 lever cap

No 7 lever cap

Proper No 8 lever cap, much better fit.
Thanks a lot Ralph...

Then I still have the boring till on the go and a lot of tools awaiting their turns to be restored.
The beam boring machine is still in parts on my bench, that Langdon miter box I picked up the other day will need total dis-assembly and clean up. Probably a good candidate for a paint job.

I got the swing arm to move freely, phew!
Yeah for Liquid Wrench!

That is an interesting feature, which I believed only shows up on MF-Langdon miter box, an adjustable width between the front post and the fence

Roughly 2 extra inches. Nice touch...
But you better have lots of rigidity in that adjustment. 

Those No 12 Breast drills don't have much japanning left, I'm thinking maybe I ll try a repaint job. It is not something I normally do, but I want to try a complete restoration job. Depending on my results I will either do a few more or send my failed attempts to Wiktor Kuc for a real good make over job :-)

So that should keep me occupied until...Squirrel! 
Oh yeah, almost forgot. This being the month of June, I'm supposed to participate in the world famous Brian Eve's build a chair in the month of June-ish on line extravaganza. So I better start giving it some thoughts.

Probably some sort of shop chair, with built-in WiFi, beer holder, 8 way power adjust with lumbar support and etc.
Hummm do I still need two seats up front in my Lincoln?

Bob, doing some therapy blogging :-)


My latest loots :-)

$
0
0
As usual when the going get tough, the tough goes shopping... for tools.

I've been keeping an eye on Kijiji (sort of on line flea market list) for tools around here, except that I enlarged my territory, I now see all listings province wide :-) Car trip!

There is also a local business (Bargain Harley in Berwick NS) which has lots of liquidation stocks from past business, which means when foraging thru I sometimes find New Old Stock (NOS) Stanley tools and bits from various eras.
They have a similar well stocked (NOS) hardware section, so it is also a good place to check for your project's hardware first. That is where I usually buy screw's by the bucket and piano hinges etc.

I have been looking for a long time to complete my set of Irwin's brace bits. I have 3 missing from a complete set of 13, and I could never find them, or they want a fortune... Saw my Lincoln coming from afar :-)

As mentioned above, I often rummage thru the drill bits section at Bargain Harley, you'll find some pretty good find, including most sizes of auger bits NOS. So I bite the bullet and paid about CDN $8 each. Sizes 13 (13/16) 14 (7/8) 15 (15/16).

My three missing sizes... in good shape :-)

NOS made in 1995 (21 years old) and the remainders 2003 (13 years)
Notice they are all made in Brazil?

Today I got the call to go visit someone garage from an ad I responded on Kijiji.
This gentleman was selling a bunch of handsaw for CDN $3 each, about 70 or so in all. Some D12, D7, D8 etc.  I just had to go...

This is what I found.

The saw pile is getting smaller it has been picked 
at least twice before my turn.

I went thru it, picked a few while talking to the gentleman. I explained to him that I surely did not wanted the whole pile just a few, I already have 67 do I really need more?? He said OK, but when I tallied up my saws he said the $3 ea was if I bought the whole lot, the six I had would be $50. Nah, way too much, so I pare it  back to 3 and asked if he had anything else to sale. Braces and planes was his answer. Oh, my eyes must have perk up, cause he made me a deal I could not pass, CDN $5 for any braces, picked the only plated Sheffield brace.
I passed on the usual Stanley No 5 and etc, but found this Chiv or Howel plane, mine for CDN $20, so I gave him CDN $25 for his three saws and everyone is happy :-)


Yes, $25 is too much for these 3 saws, but i got a heck of a good deal on the rest so, I don't mind and we both shook on it.

Now remember me not to wear black denim the next time I go rust hunting in a dusty wood shop, I was kind of gray when I got back to Rudy waiting for me in the car.

So what was so special about these 3 saws that I was willing to pay $9 ea (45/5 = 9).

That one has a rarely seen H Smith St-Catherines Ontario medallion.
This will later become Shurley Dietrich in Galt Ontario, 
then in the 1930s Shurley-Dietrich-Atkins

Disston, warranted superior. 
Not quite what I thought, but I'll take it.
The carving on the handle threw me off :-)
That handle is not stained it is some sort of dark hardwood.

That one has nothing special... except; it is my all time favorite comfortable handle, AND it has three medallions. Doubt very much it came with three and look how wrong the handle hang angle look on that saw plate.
Our thrust line is going up, not toward the tooth line!!!
Can you say, replacement? Don't care I am after the three donor medallions :-)

But here are my prized $9 scoop:

A Chiv or Howell (not to be confused with the similar looking Croz or Groove plane)

They don't always have a side handle and 
that one has a wooden cap iron screw in, older's have a wedge

look at that gaping mouth...

This tool was designed for dry cooperage or sometimes small wet casks. The differences? Wet cooperage is made principally of white oak a hard wood, dry cooperage used softer cedar, pine etc.

This make sense given its location, in the middle of what was once one of the biggest exporting region of apples (dry cooperage) in the British Empire; the Annapolis Valley in Nova Scotia. Today more and more apple orchards are turning into vineyards instead. More money into wine than apples I suppose...

And then this sad looking British Sheffield plated brace. So called because it has brass plates on both sides held by steel screws (never brass) which of course caused corrosion. It look sad because the wood is dry and dirty, it will clean up just fine.
Push button chuck.

There is some play (too much) in the head, but that is an easy fix.
I'll show you how later.

See the markings between the chuck end and the button?
Hard to read but once clean should be clear.


  I am happy, Rudy is happy, seen more doggies and peoples today. We went out for supper at a friend's place. Great food great company, we are now both tired :-)

Good nite


Barton Brother's Sheffield brace

$
0
0
In my last haul of goodies (AKA tools), there was a yet, unidentified Sheffield plated wooden brace.

They don't always have markings to be found, but when present they are usually stamped near the chuck end, before the button to release the bits.
Another place, often used prominently, is on top of the head. You will often find ornate brass disk proclaiming some virtues and of course a maker...
And lastly I have another with only a stamping filled with black ink on the side of the nose on the wood part.

As found
After a quick scrub with a plastic scrubby 
and Murphy oil soap, (full strength) for the wood.
Sponge and Twinkle for brass and copper, buffed with towel.

I am not trying to make it look new, just cleaned for close inspection and assessment. Wish I had some Kramer antique restorer to wiped it with...
Any one knows if and where available in Canada??

It is a beech brace with brass plates and a button operated chuck with a rosewood head.

Lets see if we can now find some markings on it to identify its maker.

You can barely make out ... Brothers...

See it now? With flash

No flash

So we have a name, now lets go online and google it.
Here is what I found about this company:
From Don McDonnell of Eureka Springs, AR in response to a question on a forum

Quote The Barton Brothers firm appeared in 1849 and 1852 Sheffield directories as " Merchants and Manufacturers" at 231 Glossop Road.
As far as Ken Roberts was able to determine (and in my research has come to the same result), the firm was never entered in any of the classified trade listings as edge tool makers, brace & bit makers etc. Even though the firm's name appears on braces, chisels and plane irons.

However, we do have some additional information which appears to extend the possible dates of this firm, somewhat. The principles of the firm were Edward and William Barton. In the 1849 and 1852 directories, Edward is shown as residing at East View Sheffield, while William is shown as residing in New York city.

Edward is listed as a merchant at 231 Glossop Road in the 1856 and 1857 directories, while residing at Endcliffe Vale (Edge).
He disappears by the 1862 directory. According to Ken Roberts, in _some 19th century English Woodworking tools_, the Barton Brothers firm was listed in New York through 1855, then simply as William Barton & Co from 1856 to 1860.

So it would appear that tools were being manufactured under the Barton Brothers mark from around 1849 to around 1855 - possibly until 1860 if William Barton continued using the same mark.

Roberts shows a couple of Barton Brothers braces in is mentioned book. One appears very similar to Pete's brace and mark.  The other is more elaborate and claims to be based on a patent. Robert states that the nature of the patent is unclear and opines that the brace may have been made by Henry Browns & sons of Sheffield. Unquote

Not mine

So my brace is dated from between 1849 to 1855 and possibly as far as 1860
Pretty good ball park, thanks Don :-)

So what does the head of mine look like?

NO, no ornate button on this one.
Notice the two holes on the two previous button?

These twin holes, of various spacing's, from various makers and models ad nauseam... Anyway, I am pointing them out because this is how you take the head off or just tighten it after removing the cap.

Here is a typical inside the head view, see the nut at the bottom?
That is also a Barton Brothers brace.

You take out the slack between the brace body and the head by removing the head, replacing the wear brass disks (or add spacer), OR, often just by tightening the nut down. Careful, you need some play and the head should rotate freely without wobbles.

The above pic (view inside) is not mine, it came from this auction I found on EBay.


And since we are talking about the head,,, Where was mine! How did I not noticed that before...

See it?

See it yet?

That is a big chunk missing, yet, did not noticed before...

This has happened to me before, I am aware of why and how, yet... I do it again sometimes :-)

It's the sense of anticipation rising, the adrenaline rush from about to score the deal of the century feeling. Its all these things that make you feel: Quick take my money before you changes your mind (it was only $5 remember :-)

Anyway, just wanted to share since I am sure some of my readers had similar experiences once or twice. And now you know why and how :-)

But in all seriousness, it's no biggie, seen worse, does not impact its work-ability.
It is the only apology on an otherwise good shape brace, would be even better once I fix the head play.
Maybe I'll try grafting a new piece of Rosewood sap wood in there...


Here is something I have never noticed before, or that I remember... It's not that I forget at my age, it is just that my memory banks are full.

The No 24 on the business end of the chuck.
Is it a model No? An indication of the sizes bits it will accommodate??

Wooden brace of this type do not accommodate large bits or bits that would required lots of torque. It is after all, a wooden brace, not a modern steel one.
And even then, they took the precautions of adding reinforcement plates on each sides over the short grain areas. (the bend)

The other side of the brace, 
showing the reinforcement brass plates 

See the notch filed on the 3rd center bit from the L.
A properly sharpened center bit does not require too much torque.

The next logical conclusion of this design was to do away altogether of the weak wood parts in the bend but to retain this look.

Ultimatum brace. If you look carefuly, she is bent at two locations :-( 
Pic from TFWW, link below

The results was the Ultimatum brace. That was considered more of a status symbols, like a plow plane in some circles, than a "working tool".
So they were made will all kind of very exotic, rare and expensive timbers and had often very ornate decoration on the head's button. Some were out right presentations pieces.

Essentially two cast box, stuffed with expensive timbers joined together by a metal rod with a turned wood handle over it. That juncture of the handle to the cast boxes is the Achilles heel of that design, they do bend.
Essentially a 'framed' brace vs the 'plated' brace

So these wooden, plated Sheffield brace, were truly the workhorse of their period. Until taking over by the American steel brace, a stronger design for sure.

And since there was no standard between tool makers over the location of the retaining notch on the brace bits, it is not uncommon to find bits with two different notches filed. That would had been done to accommodate a different brace at one point.

Here are my two Sheffield plated brace, side by side.

Top Barton Brothers,
Bottom William Kent
Both from Sheffield

Another place where they are sometimes marked, 
but often long worn off or hard to read.
The stamp is ink filled on the Wm Kent

The business end of the Kent. Only markings are C or O and 5.
The Barton Bros was stamped 24.

Hard to see, but Barton has a slightly bigger chuck opening 

same Irwin bit inserted as far as it will go in Wm Kent

Same bit in Barton Bros

As you can see, the heads are attached similarly, 
with wear brass discs

Bob, with inputs from Rudy... :-)

Happy birthday Rudy

$
0
0
Today, the 15th of June,  Rudy is 1 year old.


Back in the last fall, when things were quickly going from bad to worse, she mentioned that we should get a small dog companion.


That was the strong hint that Heather wanted a small puppy...
That his our friend Susan's Blue Bell

So at the end of Oct this little guy "followed us home"
He was 4 months old at the time

We quickly bonded as you can see


One of his first engagement was to be a part of our Christmas photos.
What we did not knew at the time was that a new tumors had metastasised on her neck.
She felt sick and we had to cut short our photo session.  

We still managed to get it done, what a trooper...

His next photo session was for his first Christmas picture.
Oh what fun that was to line up with numerous dogs for that pic...
That is when he discovered his barking voice :-)


When I'm typing my blog, he likes to be part of the action

He was just what the doctor ordered, a faithful companion...


Until the end...


So today, Rudy is one year old. Happy birthday little guy, you have given us so much already.


Bob, who is gonna give him a bit of ice cream to celebrate :-)

Update on boring till and etc.

$
0
0
My car has now 4 new rubbers on, new springs up front and four new shocks installed.  Yes, following that pot hole from hell, last summer in Boston,  I ended up rebuilding the suspension. The shocks absorber did not needed replacement at that time, but I figured they have over 100,000 Kms lets get them done now and should be good for as long as I keep this car.
Barring anymore Massachusetts's size pot holes, that should last me till I trade the car in a few years, I would like to enjoy a few years without car payments thank you.


My car sitting on three wheels and my emergency tire on the front passenger side...


AC "complaint" was addressed, simply needed a recharge, no leaks. the car is now road worthy for long trips and Rudy is getting used to wearing his safety harness in the car.


And then the car start running like crap and when starting it tells me that my engine is overheating???? WTF, they troubleshoot and stated that my thermostat (heat sensor) in the engine head was kaput. Parts came in, left the car at the dealer drove off in a courtesy car, then they called back...
Its not the sensor, it's the wiring ... They found a large rodent nest under the engine shroud cover, the little rascal had been busy... @#^&&*$ need new parts, sigh
The car is now driveable short local distances, no engine heat indication so the computer goes in "no heat mode" meaning no AC available, crap...


My PC at home is giving me fits, with Google Chrome, if I found a rodent nest inside my PC I am going to declare war on these little rodents. And if anyone thinks that chipmunks or squirrels are cute, just remember that they are still rodents, basically a rat with a fluffy tail!
My next project??? :-)

In the mean time a good friend has suggested to me that I should set aside one hour each day to do what I enjoyed the most, woodworking. Go spend an hour each day in the shop! If nothing else, if I do that at the base woodshop, I'll also will get to meet fellows woodworkers and get the distractions I need.
So, starting Saturday, I thought, why not? Lets give this a try.


For my first time, I brought my carcass pieces for the boring till.
Although I had previously written that it was " quick work to dovetail the carcass" I did not do it yet when I started drafting that post, and I never gotten around to finish it. Today is the day, lets move on!


So I did, and in that hour-ish time I spent there with Rudy, there was nobody else, so no big bad machinery working, just me working by hand on my dovetails.
It was a tad ironic, the bench I was using still had our router's dovetail jig set up along with a photocopy of the instructions set besides... and here I am chopping mine by hand :-)


So managed to make some small progress, should be able to finish assembling that boring till carcass soon


Sorry no pics, I forgot my camera :-(


Bob and Rudy, working as a team.
Rudy does the final trim to size by chewing the ends of boards which I then true up with my shooting board :-)

The slowest build...

$
0
0
I would like to say that things are progressing on the boring till, and there are...but at a glacial pace...


I started on it in earnest on May 21st, getting down my requirements then figured out my dimensions. After a few last minutes changes, I ''finalized'' my design on the 24 of May, then two days later, I cut and machined my frame pieces.

If you look closely, you can see the knot at the end on the top piece

It was not until the 19 of June that I finally cut the pieces to final length. I previously cut them slightly longer in order to have some fudge factor for the final in situ size.

That was the maximum size I will entertain with this space.
I decided to cut it back a bit. I look a bit too large

 Once I was satisfied that my new till would fit its intend location, I could then cut the dovetail pins on the long side pieces (2), then on the 22nd I cleaned the joint half, ready to transfer my pins on the side pieces.

Me getting away using the dining room table...

I was going to finished them on the 23rd, but by then I realized I somehow missed a big knot smack on the end of one of my side board, not good...

How the heck did I miss that earlier??
Where it land would give me lots o trouble it has to go!

So yesterday, Friday,  cut off that knot, which means my final dimension would be a tad smaller than anticipated, but still close enough to my experiments sizes that I'm not worry about making it hold the tools I have in mind (always subject to last minutes changes of mind anyway :-)

It is not because I'm slacking off, I just had a myriads of things vying for my attention... besides Rudy!

Rudy helping me with my house inspection

First there was my annual walk around inspection of the house, looking at how the paint and caulking survived the winter and etc.
There always seems to be small spots here and there, and this year was no exceptions, the front get the worse of sun and wind, there are always some spots that have the beginning of paint peeling. These I scrapped then prime and paint.
 
These spots were a lot smaller before I scrapped them

We are going thru a heat wave right now, so that limit my opportunity window for painting. You should not paint when it is too cold, nor too hot.
Followed the weather forecast for a while and managed to squeeze it in, all my spots are done. And then there are the multiples flower beds that need cleaning and new plants etc, etc...

Done for another year...


Did more executor stuff, pretty well all done, the only remaining items are shopping for house and car insurance (in progress) and select a suitable headstone... After I pay for the funeral, ouch!
And I finally got my car fixed, ($521 later, I hate rodents!)
My paperwork for my veteran plate came back, got my vet plate on the car.
Some of my civilian friends asked me if I was worry about advertising my military background in the wake of all these terrorists attack.
Oct 2014, a lone gunman shot dead one of our sentry at our national war memorial in Ottawa then storm the parliament building, he was shot dead by the Sgt at arms for parliament. And shortly before that another member in uniform was run down in a parking lot in St Jean Qc.

This editorial cartoon in the Halifax Chronicle from Bruce McKinnon resonated around the country. The signed original has been given to the family of Cpl Nathan Cirillo 

Hell NO, I may be retired but I'm still dangerous.. Don't let the gray hair fools you :-)
Ever see the movie R.E.D.  with Bruce Willis ?
Thread lightly on vets :-)

This Sunday, Rudy and I are attending one of the three celebrations of life for Heather.
The first one being in Halifax, organized by the members of her African Violets society in the city.

The next one would be held right here in my house on Canada day ( Jul 1st), then the last one, still in planing stages, would be in Ottawa. So all that to say, that I am not expecting to finish this boring till this month.... Unless there are 90 plus days in June... (Inside joke about the build a chair in the month off Jun..ish)
Which reminds me, I better get off my butt and decided what I'm gonna build for that event...
I thought I had a suitable piece of pine for the seat blank, but it is not thick enough, may have to laminate some stock. So will I be able to finish that chair project this month? Well has long as this June is as long as the last one, then yes!
Right Brian? :-)

Bob, hoping to get some clearing done in the garage...

Found some tools in my garage ...

$
0
0
I have spent the last two days sweating it out in the garage, trying to regain some sorely needed spaces, from the chaos it has became in the last year....

Moved stuff outside so I can walk around the table saw

Ah, there it is. Found it! I thought I had a Unisaw somewhere in there :-)

The Radial Arm Saw resides temporarily on top of it
until I decides what to do with it. The cardboard box on top? 
That's my portable spray booth :-)

Yah, I know lots of room for more downsizing/turfing...
But at least I can now walk around it, bonus

That poor jointer is starting to rust. 
Its grand time I attend to my cast iron surfaces 
in the garage and protect them. TS, RAS, Bandsaw, Jointer, DP

I think that for now, I'll just spray them with a liberal coat of WD-40 until I get "Round-To-It".
Also came across more handsaws (imagine that :-) and a few more tools I have not seen in a while.

Now I have an accumulating pile of stuff awaiting a truck for the dump, that, and a few boxes of donation and etc. Once these are gone, I will them continue with my late Spring clean up.

How warm is it around here now? My grass is turning yellow and crunchy, there is a burn ban all over Nova Scotia right now.

Bob, sweating buckets, man it is getting warm, but heh, not complaining, it could be snowing :-)

Viewing all 377 articles
Browse latest View live