Quantcast
Channel: The Valley Woodworker
Viewing all 377 articles
Browse latest View live

Stanley in England

$
0
0
I am still researching Stanley operations overseas in a bid to narrow down the time line of Gerhard's collection of Yankee spiral screwdrivers.

There is not much to be found about Stanley operations outside North America. But armed with a few addresses we can look them up on Google Earth and try to put some of the pieces of this puzzle together.

Found this very helpful site in the UK, The Grace's guide to British Industrial History

From it, I found a few address for Stanley's operations in England.
We already known they entered the British market in 1936-7 with a controlling interest in JA Chapman, but they eventually became Stanley Works then Stanley Tools. When, how and where?

The Stanley Works (Great Britain) Ltd
It shows Stanley Rule & Level Co Dept (Tools) which merged with 
Stanley Works (Hardware) to becomes the Stanley Works in 1920.
This picture from Grace`s site says 1927. 


This Stanley No 79 side rabbet plane came out in 1926 and the arc cut out dissapeared in 1950.  The small router plane No 271 also came out in 1926 so the time period look correct. But Stanley did not start manufacturing tools in England until they bought controlling interest in J.A. Chapman in 1936.
The address shown is in London, so that was probably just a sales office and not a manufacturing concerns.

The Stanley Works (Great Britain) Ltd
Stanley Rule & Level Dept.
35-36-37 Upper Thames ST. London E.C.4


Chapman is listed in the Planemakers Data base 
As a James Arscott Chapman Ltd Industry Works
115 Woodside Lane, Sheffield 1868-1936
That last year would be the year that Stanley took control of the company, which then became, The Stanley Works (Great Britain) Ltd

The area I highlighted in red is what I believed was the original JA Chapman building which became Stanley works (GB) in 1937. The demolished area, now a used car lot was probably the original building

The reason I am saying this is because their address is later changed to Rutland road (the main artery running vertical in the above pic on the LH side). Then there was a new factory build in 1961.

An artist's impression of the new factory to be built in 1961 

This look a lot like it and it looks like it is now abandoned.

You can still see the name Stanley Tools on the building which 
would have been the new part build in 1961.
Looking from Rutland Road.

There are broken windows and some are boarded with plywood.


The building is available to let (for rent).
The cars you see are from a used car lot on the premises

May 1957
This one is showing an address in Sheffield as
Rutland road Sheffield 1

Rutland Road as lot of old industrial buildings that still have Steel industry markings on them. Found this one not far down the road on Rutland Rd.


So thanks to Google earth we can explore the sites from the comfort of our computer chair, pretty neat. By the look of their original site is has been vacated years ago but when and where did they moved?

Last entry at the bottom of this page dated 29 Mar 1979
They refereed to Stanley Tools of Sheffield.
Interestingly they also mention the ALCAN award. ALCAN is the Aluminum Company of Canada, of which the main plants are located in the Saguenay Qc, where I was posted twice in my career. The airbase there was set up during WWII to protect the vital aluminum industries.

Is Stanley still making tools in England or have they moved all productions off shore? (Taiwan, Mexico etc) I do believed they were still making tools in jolly good England as of the early 80s.

Did not found all the info I was hoping for, but this is a start, and perhaps some of you would be motivated to become involved in this search.
Meanwhile, Stefan of the Bluespruce woodshop has agreed to look up some trails in Germany. The original Stanley's Velbert plant in Germany is about 30 Kms from where he is from, and he says he never knew Stanley was so close to him. That tells me they have long ago moved...

Bob, the arm chair tourist and reporter hot on the trail of Stanley's past 


All about miter boxes Part 1

$
0
0
I recently exchanged lots of info with Gerhard over troubleshooting his Langdon Mitre box and his mitre saw so that it would cut true.
So I thought I should make a post(s) covering all the basics and proper set up .

First a short description on the various types of Mitre box.

Long before being replaced today by the ubiquitous power mitre saw, some of which also handle compound angle cuts, the simple wooden mitre box ruled the shops.

Probably the most common form we are used to see today 
when we think: Mitre box for hand tools. 
This modern one is missing an old timer feature,
 a front bench hook to use on the bench.


There are nothing new and the numerous designs all evolved from the need to cut a square 90 degrees cut or a 45 degrees miter cut, the two types of cuts most employed in our work.  Some will also cut the often used 22-1/2 degrees and some are infinitively adjustable in between these common angles.

Here is one different take on the common miter box, a variable angle one called Magic miter box.


Magic (gizmo) Miter box.
It slice, it dice, it shred??...


One of the first useful appliance you should built for your hand tool shop is a simple bench hook. These also comes in various flavours, but this common form is useful as a cutting help for 90 degrees .
They do not have to be too large, this one is 6 in wide, plenty big. When cutting longer piece you simply add a short bench hook to support the end.

From the Jig Journal Chris Schwarz
Popular Woodworking June 2007.

Now add one or two of your most often used angle cuts on the rear fence part and you have a "mitre box".

Some seems to think that the use of a mitering device is nothing but like using a crutch and would rather cut them free hand, but there is a lot to be said about doing repetitive, duplicate cuts.
Yes you can train your hands and eyes to cut straight or a 45 degrees using the reflection of the saw plate, but there is nothing wrong to be using a mitre box when you want repeatability. Add a length stop and you will find it easier to make square assemblies with mitered corners.

The form we are perhaps the most used to by now, is a simple variation on this design, that was mostly in response to the increase uses of molding pieces around the rooms. What was once the domain of the house joiners, now finish carpenters, is now routinely done by DIYers everywhere.

One small detail often missed on the modern form, is the fence wall has to be high enough to be able to stick the moulding pieces at the same angle as it would be on the walls. If you cannot do that and are cutting on the flat, you then would have to figured out the compound angle required with a bit of trigonometry. Yikes, easier cutting at the sprung angle :-)

Here is a clever compound angle calculator I found on line that will save you from reaching for that Aspirin bottle :-).

And here is another for cutting mouldings on the flat

Nonetheless, if you simply sprung your molding piece at the same angle that it would be installed on the wall or ceiling, you can then simply cut it at 45 degrees.

There are endless variations in plastic and metals and adapted to various tasks from big moulding pieces to small decorative banding pieces.

A modern plastic one from Stanley with removable plastic stops.

My Zona small back saw and mitre box
for really small work like miniature work or cutting banding (what I used it for)
That back saw has a 4-1/2 in long saw plate X 1/2 in deep cut.

Perhaps the biggest draw back to this design is that as the slots becomes damaged or worn out, you loose accuracy. They also makes them in anodized aluminum but they will still suffer the same fate down the road.

In a bid to overcome this problems, some comes with adjustable shoes or wear plates that can be adjusted to the saw plate.

Adjustable shoes miter box

But not everything we comes across has square 90 degrees corner (despite our best effort :-) and having the possibility of infinite variable angles is a blessing.

A Stanley No 115, 4-3/4 in capacity.
Pic from EBay

Stanley No 150 mitre box with a 16 X 3-3/4 back saw

Picture framers have to make precise 45 degrees cuts all day long, so there are specialized mitering devices made for them.

A Stanley No 100 Miter machine.
Original design is from Marsh tool company which was bought by Stanley in 1926. Early models are not marked Stanley.  Pic from EBay.

Guillotine type devices that slice rather than cut the wood can make very accurate angle cuts and with some clever attachments will handle compound cuts.
The original Lion miter trimmer from Pootatuck Corp.
I think that they recently stopped production, but there are lots of Taiwanese copies out there, some better than others. They are only as good as the casting and machining. 
  

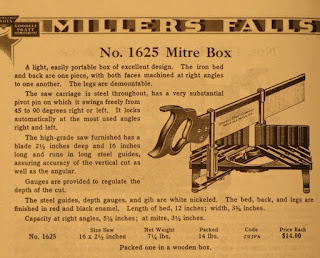
There are no shortage of patented design thru the years, but perhaps some of the best known ones are the Langdon/Millers-Falls design and the equivalent Stanley models.

Langdon/MF No 75 with a 30 X 5 in backsaw.
Pic from Gerhard blog.

Stanley No 60 mitre box with a 24 X 4 in backsaw.

These two models exemplified the two common approach for these types of mitre box. Where as the Stanley as a replaceable sacrificial board which gets chew ups badly with time and with poorly adjusted saw guides, the Langdon/MF type uses instead a fix cast or stamped metal bed and a pivoting cutting slot which sometimes have adjustable plates on each sides. Much like our modern powered mitre box.

Pivoting cutting slot.
Fixed cast guide that support the wood on each side of the cut.
This is on my Craftsman 881-36301 Hempe made mitre box. 

Another popular type today is the modern European style that uses a frame saw versus a back saw. There are a multitude of cheap Far East copies being made and sold, but the original NOBEX's ones made in Sweden are pretty good.
Good enough to be sold by LV ;-)

NOBEX Professional model.
The small drawing on the RH side shows how the ribs on the cast bed can be used to sprung moulding to the correct angle.
Pic from LV site.


These types of boxes work great but they requires a flat bed for accurate operation, so regardless of types, you must take care not to introduce twist on the bed by tightening the box on an uneven surface. Either stamped feet or cast brackets will introduce twist if you are not careful, hence it is a good idea to fasten the box on a stout base. I Like to use 3/4 in plywood, providing the piece is dead flat...

Finally rounding up our look at saw guides and mitering devices, there are some adapted to be used with Japanese styles saws used on the pull stroke.


But for this series of posts we will concentrate on the conventional miter boxes such as my Stanley No 60, as I go thru its rehabilitation and set up. Including sharpening and tweaking the saw for the box. Spoiler alert if you read Gerhard post you can learn how I do that :-)

One last thing. In case you are by now wondering, why in this day and age does anyone would still want to use one of these antiquated design instead of a new fangled powered sliding miter box with laser guide etc, it is because we care about our fingers ....
If f you ever had to trim off a small piece on one of these fingers eating power devices, you will quickly appreciate the safety of these miter boxes.
Or what about having a small piece fling off the power miter box. Just cannot happened on one of these true time tested design, so yes they still have a place in our shops and bonus, they are inherently safe!
.
Bob, the shop time deprived woodworker.

All about mitre box Part 2 The saws

$
0
0
There are 3 types of hand saws used with mitre boxes.

You can use a regular handsaw, with some of the various types of mitre boxes.

Original Star Mitre box design

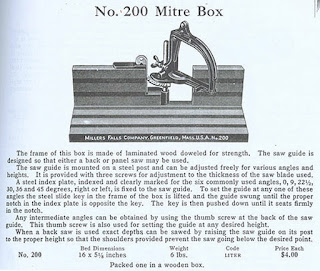
This Millers-Falls No 200 similar to the Stanley No 115 shown previously,
 can accommodate a Handsaw OR a Backsaw

This style of MB is still being made today, and yes, they still 
accommodate both Handsaws and Backsaws.
Empire Level Co.

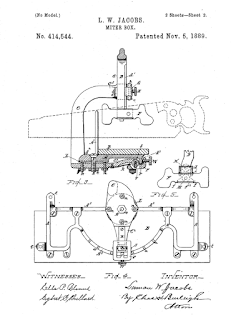
Original patent drawing for what became the Stanley No 150 Mitre box.
As you can see, it can easily accommodate a wide range of saws, 
handsaws and backsaws.

A Badaxe 20 in back saw in a Stanley No 150, a sweet combination


My Stanley No 60 MB also has provision to use a handsaw in a pinch... 
The two holes on the guide parts are to put in a nail or cutter pin to prevent the saw to ride up too high and destroy its set. 

A fulls size 26 in handsaw fits, but I cannot insert the rear nail in the hole...
Unless I move up the guides, the saw is currently resting on the bed.

A small 17 in Panel saw fit, but as you can see
 it severely diminish my stroke length... May be 2 inches...

Other are designed around a frame saw, such as the NOBEX and numerous clones, which makes it nearly impossible to use the frame saw outside the miter box.  If you could, you would surely bent it because it relies on the mitre box guides for extra rigidity.

NOBEX Professional

One of the many Asian's clones. 
That one look sturdy (?)

And if the blue one kinda remind you of a metal hacksaw, yes, they also made similar MBs equiped with metal blade for cutting metal, long before the motorized hacksaws.
But for best results we want the saw plate to be as stout as can be in order to achieved better accuracy. That would eliminate the handsaws and leave the backsaws and the framesaws as our best candidates, since both design put the saw plate under tension. One last thing about these types of cross cut saws, they are only as good as the blade you put in. Thankfully you can buy good quality blades and even some with Japanese style cut teeth.

Of these two, we will concentrate on the backsaws, since this is what the common "good boxes" sometimes came with (a backsaw). Sometimes not and even if it did originally, it could have been long ago separated from its box, so...
How can we tell which ones fit what boxes?

Critical dimensions of the saws VS box capacity

Today's motorized laser guided mitre boxes suffer the same restriction as the model of  yesterday... Space!

The more capacity (maximum board width that can be accommodate), the longer the saw stroke and the space required, and similarly the guide bars would be taking lots of space on a sliding motorized miter box.

For practical reasons miter boxes are traditionally sized to the work at hand. A few scrap boards and the carpenter could make one to cut the coves and the crown mouldings in the house. The box dimensions being fashioned to best hold the pieces at the correct orientation. These boxes were often destroyed after job completion or whenever they wear out.

Similarly the Langdons and Stanley Mitre boxes were made in a variety of sizes which came with a corresponding varieties of mitre saw's size.
But again we are getting ahead of ourselves...

From T to B;
26 in, 24 in (clipped heel) and a 16 in 

Probably because of their rather long sizes, they never came with a brass back bar, always folded metal bar. Weight would probably be an issue with brass bar.

Typically Mitre box saws are from 22 in to 30 in, although some smaller MBs can easily accommodate 20, and 18, even 16 in back saws.

The larger ones, 24 in and above should never be used outside a mitre box. The spline is not strong enough, you can easily bend such a saw, please don't!

The length of the saw plate determine the maximum capacity that the mitre box can accommodate. Remember that the longer the saw the more clearance required behind it for the full stroke of the saw. Yes, I did say the full stroke of the saw... within the confines of the guides. It will cut faster with less wear and more evenly wear along the teeth. We want that! What we don't want is to pull the saw out of its guide!

The other measurement that would determine the max thickness is the depth between the saw tooth line and the bottom of the back bar (or back spline).

A typical Mitre box saw. Disston Canada, made for Craftsman.
26 in long X 4 in deep, 11 TPI Crosscut.

These two dimensions E.G a 26X4 in backsaw, are the two critical ones we need to know in order to answer the question: Will this back saw work with miter box model XYZ.

Next we need to look at other dimensions, the guide system for the saw (Guide, post, sliding plates etc.)  How much of the saw plate length does it requires?

On my Stanley No 60, the distance from the rear fence 
to the front of the post is 7 in. and the bed is roughly 4-1/2 in.
The stated capacity of this model is  4-1/2 in (Coincidences? :-)

SO WHY DO WE NEED SUCH A LONG SAW?


Critical dimensions of Stanley MB 60
with a 24X4 backsaw.

In the drawing above (done in Doodle 2.0 :-) you can see that with the saw pushed in as far as it will go, we are gobling up 10-1/2 in between the guides, regardless of the saw position, and the first 2-1/2 in from the heel is lost.
That amount to 13 in already and we haven't moved the saw yet!
That leave us about 11 in at the other end, of which we need to leave about 2 in out when the saw is pulled to the maximum out and still engaging the rear post.
That leave us with about a 9 in stroke with a 24 in saw plate!!

Now you may be thinking, 9 in is overkill, my max capacity is 7 in!
YES, but 9 in is the maximum stroke, few of us will do that... So we put in some "fudge factor"

We want to have the saws teeth to traverse to whole width of the wood piece being cut in order to clear the saw dust. If you try to nibble away a 4-1/2 in wide board with only a 2 in stroke, you are indeed nibbling!! The saw dust not being cleared away will cause overheating and could distort the saw plate... You been warned!
Then what is the maximum capacity of the miter box?
That would often be determined by the width of the bed and the maximum spacing of the post, guides etc. Stated capacity will often leave "some room" out to be able to judge where the saw engage squarely at the board edge.
Why would you care? Because you can tell if you are cutting true or drifting...

For example, the largest MB Stanley made, model No 460
comes with a 30X6 saw and its max capacities are 11 in at 90 degrees.
Less of course at 45 degrees. 

The capacity at 90 degrees listed in the above pic, are the maximum allowable between the rear fence and the front post.

The stated capacity of this No 60 box (nominal) is 4-1/2 in, the dimension of the bed from the rear fence. And the maximum capacity is 7 in. (from rear fence to front post)

This Mitre box is a mid size model, the larger ones will handle max up to 11 in.
with a saw plate of 30 in. A big monster for sure...

Then take a hard look at the post, or guide mechanism.
Does it allow you to park the saw at a elevated position?
This is to enable you to slide the piece under without having to hold up the saw.

Stanley No 60 showing both trip lever that hold up the saw.
A very secured mechanism. Not quite high enough to clear the beer can :-)

Please note that many Stanley Mitre Box requires a special horse shoe clamp and screw to be attached on top of the back bar of the saw (circled in red).
This part is often Missing In Action. It is required on the saw to trip the catch lever to release the saw.  There is apparently a second source for this part. Besides Stanley who long ago stop making it.

Careful not all designs hold the saw securely!!


These two pics from my HEMPE made's CRAFTSMAN
miter box No 881-36301. Later models have a modified, more secure, catch mechanism
Front post 
Rear post. Those brackets do not inspire much confidence.
If I bend them in further, they becomes hard to push out to engage.


The distance between the saw's teeth line (saw elevated into the "park" position), and the bed is the max capacity for depth of cut.

This MB No 60 with a 24X4 saw has a clearance of 4-1/2 inch. 


 So if you are tempted to put in a smaller saw in a bid to get more cutting depth, (say replace a 5 in saw by a 4 or 3 in saw) note that you may not be able the adjust the post depth stops to compensated. There is a finite range of adjustments within a given mechanism. For best results, you are better off using the recommended saw size.
E.X.: a Stanley No 358 mitre box is designed for a 28 in X 5 in saw

Most of that adjustments range is to compensated for the loss of depth after sharpening. Some of the better ones also let you adjust to a fix depth of cut to do lap miter joint, dados and etc. Not a thru cut, but a stopped cut.
Again, for best results stick to the saw that the miter box was designed for.

Sometimes the instructions will call for a range of saws that the box will take
E.G. A typical box would says handle saws from 18 to 20 in

You will also noticed that these saws always have a close tote (the saw handle)
As any other saws, it is designed for a three (3) fingers grip only, NOT four (4).
Although some of the handles are big enough to jam in all four fingers in there, you loose lots of control if you try to do so, NOT to mention the saw does not feel right in your hand and you could hurt your wrist with repeated operations.

Disston made Stanley's Mitre box saw.
Showing clipped heel. 

How to best fit the saw handle to your hands?
See my earlier post on handsaw handles   The same things applies for a comfortable fit in the web of your hands. You will also notice a slight changes of the hang angle of the handle thru the years and the various manufacturers (mostly Disston, Simmons and Atkins).
Don't ignore that angle, but do take it in consideration when setting up your Mitre box at the appropriate height for you. If you have to cock your wrist too much, you will surely feel it soon...
Remember that a properly used, well designed tool should not tired you or injured you in use. If it does, you are not using it right and or with the right posture. If you have to bend slightly, bend your legs instead of your back.

How much pressure to bear on it?
Imagine you are cutting a fresh loaf of bread, you would not want to squeeze it flat while cutting, maintain a neutral hand, you are only "there" to push and pull the saw. Let the saw own weight do its thing.
And in case you wondered?? Yes, it is very fashionable to use a miter box to cut your bread at a diner party!  But watch out, red wine stain :-)


MITRE BOX INSTRUCTIONS

Improvements in Mitre Box, May 1873
A good resource for Millers-Falls / Langdon mitre boxes  Adj, repairs etc.


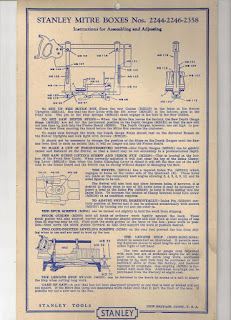
Here are some commonly found MB's instruction sheets, converted into images. As usual click' em to big' em...
Can we host PDFs on this blogger thingy??
Between these models you should find enough information to help you set your MBs as the similar features are adjusted in a similar fashion.


Millers-Falls Catalog No 42, 1938

Millers-Falls catalog No 49, Oct 1949


Stanley's Models Nos 240, 242, 244, 246
346, 358 and 460

Stanley Models 240, 242, 244, 246, 346, 358, 460


Stanley Models No 2244, 2246, 2358


Stanley No 60 Mitre box


Stanley No 150 


Next part we will clean up the miter box, adjust it then have a closer look at the saw that came with it, as we clean, and prepare the saw to fit that mitre box.

Bob, yearning for some shop time.

All about Mitre Box Part 3 Ahh the smell of WD 40 in the evenings

$
0
0
This Wednesday I got a break, I got to do a shift at the Wood Hobby shop on base, while a friend looked after Heather. Thank you Jeannie.

Did not really had any projects on the go, so I decided to bring in my Stanley Mitre box No 60 and tear it down. Inspect its condition and clean it.

Just in case I brought in some Liquid Wrench, but it was not necessary, 
WD40 works fine and that is what I used to scrub it clean.

As received, the front post was installed in the rear position.
The give away is the spring, it is designed to lift the saw off the saw kerf at completion of the cut. Since the saw then clear the board it can then be rotated without harming the saw. That feature does not quite work with the spring in the rear...

Stripped down for initial assessment.

Everything looks fine, nothing is broken. The screws (4) holding both vertical post had damaged slots on them, a little bit of work with a file took care of that. These post were supposed to be removed when breaking down the box for traveling or storage. That is true of all these types of mitre box, it does not affect their precise set up, there is a gib screw on the cast fitting to adjust them just perfectly... That screw does not move so when re-installing the post, their position is not affected, once set.   

In our Day to Day shop environment there is really no need to disassemble the posts,  except if you are thinking of taking it on the road, then I would advise you do take them down in order to protect them and their settings.

The sacrificial board has obviously been sacrificed to the gods :-)
I would need a replacement. That is the result of not taking the time to properly adjust the saw stops to prevent this... Tsk, tsk.

This look like the original board, it has never been removed ( I can tell by the screws, pristine looking Phillips) and two peculiar things. The board has some coating on it (Shellac or varnish?) and it has a small angle on the back side.

Strip further down to clean the casting and inspect.
Nothing broken,but there is a start of rusting under the brackets. 
Removed and cleaned off.

Not sure what kind of grease that was but it is pretty dry and gummy.
Notice the offset hole? That is to tweak the position of the swinging arm just right.

First initial clean up. I spray literally WD 40 on it and scrub it with a brush, wipe it, re-coat it and then lightly sand with 120 grit. I am not trying to make it shinny new looking, just get the grime off and stop the light surface rust. I leave the machining marks, It would be counter productive to sand them all off and I would ruin the precision. 


Base is now fully cleaned, look at the transition between the fence and the bed casting, it has a fillet.

That is why the old board has a taper on the back edge

So it fit closely to the fence without being  raised.
Granted the taper is overkill, but it is sure to fit without a hitch :-)
If you are making a new one don't forget that small detail.

After a bit more selective scrubbing, it is ready for re-assembly.

My friend Dave starting to machine a replacement board out of some ash he had. What kind of wood should you use? You want something that is flat and will remain so, quarter saw would be ideal. Something easy on the saw teeth, that rule out MDF or plywood. We used ash, because that is what we had. 

After dimensioning to size, the thickness is critical . It is about 1/2 in thick. Too thick and you will not be able to used the two grab screws adjustable in and out to grab the piece being cut.  You can see that without the taper it would not sit flush with the fence.

We duplicate the angle on the old board which turns out to be 40 degrees.
There is about a 1/8 of an inch thickness left at the top.

Ready for another life of dutiful service in my shop.
Well almost, still need to let the new board adjust itself in its environment, my shop, to let it do any stupid wood tricks then tweak the adjustments.

After a few days I will re-assess the board condition, making sure it stayed flat.
Then give it a coat of polyurethane to seal it.
I still need to take apart the two posts guides, give them a good cleaning.
There are the odd screws that could uses replacement, and I just happened to have a donor MB No 60, so bonus :-)

Next parts would be cleaning up the saw and tuned it for the box and run thru the adjustments making sure everything is working as expected and finally do some test cuts :-)

I dunno when I will be able to do that,  but sometimes in the near future...

Bob, resurrecting yet one more vintage tool


All about Mitre Box Part 4 Cleaning and prepping the saw

$
0
0
Now that the box is cleaned up and has a new board made, it is time to turn our attention to the saw.  Today, being Friday, is when I get a few hours of respite, roughly from noon to four. God bless you VON, so I usually heads out to the woodshop.

I have currently two saws for this box, since I found another No 60 MB in an auction earlier.
They are both Disston made for Stanley, 24X4 in and 11 TPI.
I may as well cleaned up both... Then decide which one I am going to tweak for THAT box.

If the handle has to come off for whatever reasons, I will try to make sure I have a proper screwdriver for it in order to avoid the inevitable damages if you try to use a poorly fitted screwdriver... And if that meant grinding a screwdriver to fit, so be it!

When I give an initial cleaning, I remove the handle. It would be easier after to scrub the saw plate without introducing bent into it


A problem that often shows up with saws of the 70s vintage, as these are, is the dome screw head rotate and prevent the tightening or releasing of the saw nut.


You have to tighten the dome head toward the handle to stop it from rotating. Use whatever kind of clamp to achieved that, but remember you still need to be able to rotate out the screw head on the other side. 
I find that a 6 in C-clamp work for that, It has enough give to 
skew out of the way,  but don't over tighten it...

Similar to how I cleaned the box, I use liberal mount of WD40 and start by scraping with razor blades. Why scraping? Rust is anything but smooth, and it is also the quickest way to cut thru years of old grime, just use judicious amount of WD40. Watch out it can get very messy...

After many wipe down and re-re-scraping, I will then give it a light (very light) sanding using a hard block to make sure I do not erase any etching, if present.

Miter box saw made especially for The Stanley Works of Canada

Doing this cleanup it is almost guaranteed that you will screw up the set of the teeth. Not too worry, it will have to be reset after sharpening anyway...
But nonetheless I try not to muck with it too much.

But sure enough, rubbing your hands near the tooth line 
it is bound to catch you if the teeth have any sharpness or set left in them... :-)

Depending on the finish condition on the handle I may remove the handle and strip and refinish it. But mostly, I just gives it a good scrubbing to remove grime.
I normally used Murphy Oil soap. In this case, there was not much of the original finish left and it was very dirty, so I decided to sand it off, 120 grit with a ROS.
Ah! The inhumanity of it all! :-)

I then finish with a light hand sanding

Once cleaned I go over its condition, looking for a straight blade, well sited in the spline (back bar). In order to correct some minor buckle I may have to tap the spline deeper, but not in this case. Both saw plates are straight as an arrow...


I also look for pitting near the tooth line. Just like any other woodworking edge tool, pitting near the edge is bad. Each little cross cut tooth is to be shaped like a knife (cross cut) or a chisel  (rip)

look good at, and, near the tooth line, no serious rust damages.


I temporarily re-attach the handles to the saw, using the original hardware.
They will have to come off again to refinished them. At the same time I will refinish the mitre box new sacrificial board.


Next would be jointing, sharpening and setting the saw. Wax the plate then tweak it for a particular mitre box.

Bob, grateful for the respite I get. I need the distractions.


This and that...

$
0
0
Friday being my respite time off for a few hours, I used it to do some errands and make appointment for my car next schedule maintenance, the dealership being right across the hospital were I had to pick up some stuff for her upcoming Catscan, next Tuesday.

In my travel back to go to the Base Woodshop I did a quick (?) stop at one of our local antique dealer, just to see if they had any tools :-)
Well they did, and had a sale; everything in store 50% off, so bonus.... You know what that meant... Should be able to find something :-)

An old beat up leg vise. Not sure it would be worth the trouble of salvaging it...

An older Stanley, Sweetheart mitre box.
And NO, I don't need another one :-)

The Stanley Sweetheart logo makes it late 20s.
Too bad the board is so chew up... as is often the case.
There really is no excuse for that :-(

I have no idea how old Narex has been making tools, never heard of them until LV start carrying them. That chisel looks 60s ?? I may go back and pick it up, got me intrigued... As if I need another chisel... :-)

A barn beam boring machine. I am not sure it is complete??
Besides the obviously missing boring bit. 

A large gouge with a hockey stick handle.
How Canadian, Heh! :-)

Not much planes, and some are incomplete...

In this bucket of saws, I spied with my little eye...

A small Shurly-Dietrich panel saw. 
That is the only thing that I bought.

So after sanding project parts for my son, I took the saw apart and proceed to give it a quick clean up. Same as I did for the mitre saw previously.


Shurly-Dietrich Galt Ont Can.
They were one of the first Canadian company to start using Maple leaf and Beavers on their product. Two symbols long associated with Canada.

The saw nuts makes it look modern, but in their later years they were bought by the US saw maker Atkins around 1930 and their last saws were stamped SDA
Shurly-Dietrich-Atkins, so this one preceded this.


The saw nuts came off easy, I did not had to restrained them. 

Reason is the saw nuts have a square shank and a square hole in the handle
to prevent the nut to rotate. Both mitre saw I did recently did not had this feature and were spinning freely.

Strange hole pattern, look like it was off and had to be re-drilled??

I sanded the handle, there was not much finish left on it.

She is now re-assembled and back home in my saw till. I need to pick up some stain and finish for my saw handles. This SD panel saw had some trace of red stain on it. I happened to have "more" SD saws and some do come with a red finish on it, so I think that is what I will do with this one.

One of my "other" SD saw with a redish handle.

It has the beaver medallion on it.

I really like these Shurly-Dietrich saws, they are excellent quality.
The blade is nice and straight and still cut decent, but it could sure used a fresh sharpening job :-)

That little panel saw I picked up today is filed Crosscut 11 TPI

And stamped as such; 11

All in all, not a bad day. Made some progress on my son's project and found this little gem of a saw. It's a good day...

Bob, who should finish that post for Gerhard soon about his Yankee drills.

Today is my blog 1st anniversary

$
0
0
I started this blog on Feb 27th last year as a mean to help me cope with everything going on with my dear wife. I need the distraction, to be able to keep strong as we face this dreaded cancer together.

My first post was on the first plane till requirements

So, is it working? Some days, and sometimes not... But it does give me an outlet to be able to keep my sanity.

I really did not know what to expect but with Ralph's encouragement I gave it a try.  Here we are a year later and to my complete amazement, my dribbles have been viewed close to a million times in a 100 different countries around the world, wow! I don't know what to say except thank you for your readership and support.

As when I wrote this, it has been viewed 972,928 times...
Should reach a million shortly, amazing!

Along the way, I made some good friends around the world and I'm always surprised when people locally tells me they read my blog faithfully.

This blog has also motivated me to cleaned up and better organized my shop, since many photographs are taken within.

The shop when I started
The shop now, thanks to my blog :-)

Currently my woodworking projects have crawled to a stop, due to circumstances I'm sure you understand, but I do have a list of project I am planing for this year... starting... sometimes...

I am not quite done with my hand tool shop re-organisation projects. I still need a boring till, a bottom wooden chest for under my antique joiner chest, and finish a few things around the place.  Then there is still the power tool shop AKA Garage, which is dire need of uncluttering and still need to bring in 220V for my Unisaw.

But all of these are currently on the back burner as we are about to embark on a
new promising drug trial which is sadly her last hope, so fingers crossed!!!!

My dear wife Heather of 32 years and hopefully a few more.


So to all of you who have taken the time to read my dribbles, my humble thank you and here is to the next year full of hope...

Bob
And Rudy
Who is busy giving me more woodworking projects :-)


Friday wrap up

$
0
0
On today's respite care I went to pick up that old Narex chisel at the antique shop, kind of on my way (well sort off) to the Base woodshop :-)

Look like a No 150 or 151

I thought and I still think, that they were asking too much, even at 50% off (reg $20) but after reading about the company history and was intrigued and wanted to know how it would perform.
Now $10 is still too much, yes, but I know these fine folks that own the business and I like to support them whenever I can.

I said it look like No 150 or 151 from the 1937 catalog on their site.
The difference between No 150 and 151? Beats me, its all in German!! :-)

So mine is NOT from the Richter years, but rather NAREX, but it is still made in similar fashion complete with the sticker proclaiming EXTRA, just like in the Richter years. If it was from the Ritcher's years it would apparently be quite valuable and collectible (that's what they say on their site)


Unfortunately the area severely rusted is where I would 
have expected to find markings, model, size etc. 

The remainder of the blade look pretty bad, 
but I recovered worse :-)

One thing that I did not noticed at the time of purchase was that the blade back is bellied, ether by curvature (bent) or because the front 2 in or so have been honed a heck of a lot.

It's quite a dip, but the other side does not exhibit much curvature.
Almost look like the front got quite honed to death (belt sander??)

If it was curved in the other direction, that would be a problem, but that, I think, I can minimize it or live with it. I tried banging on it with a ball peen hammer on an anvil, then squeezed tight in a big vise jaw, did not seem to make one bit of difference. I don't want to break my $10 chisel, so I'll stop there and regroup.
No I don't want to heat it and etc.

I then gave it a quick clean up, 150 grit sandpaper and brass brush on the metal parts, including the bezels, but did not touched the wood part.


Ready for storage until it get its turn for sharpening.
At that time I would cleaned it up better first.

Why not go all the way and get it ready for sharpening now then sharpen it too? Because I don't have the the time right now, but I got a good assessment of it and stopped further rust damages. Plenty good for storage!...

Then I started in earnest on the planes I brought: A Stanley No 5 Sweet Heart, with the patent date on the lever cap for the kidney shape hole and with a full length blade, a Union No 4 and a Stanley No 4 later type, Ogee frog.

The same friend that gave me the two logger's saw tools
 gave me these three  planes. I wasn't sure what to do with them, now I know.

So why on earth do I need more planes ?? Good question :-)

Well actually, I am NOT getting more planes for myself, but for my sons :-)
As we are downsizing, we asked the kids is they was anything in particular they would like from us, piece of art, furniture, whatever from our household.
I asked both if they were interested to have a kit of tools for woodworking, and they both said yes,
So, I'm putting together two tools kit for them. That should keep me occupied for a while, as I cull my "assortments" or seek other specimens to complete said kits, which the hardest part so far is to figured out just what to include!!

If you think that is easy, try making your own list. And it would have to fit in whatever cabinets or boxes I make for them. I have been struggling with such a list, my minimalist tool kit if you will,  for a while (see my first post). Chris's ATC and Hayward notwithstanding, I am still debating myself with it.

I'll show you my draft list so far tomorrow.

I did not had quite enough time to finish on my planes rescue, but the No 5 is now ready for its first sharpening job in a long time...


The Union is almost done, still need a broken tote to be fixed better than found, and the last Stanley, did not start except for blowing out the crud. That one would need new wood to fix a broken horn on the tote and a new tote screw, that original one is toasted. I probably have one somewhere...but where??

That No 5 for sure will make it to one of my son's kit, these two No 4s, not sure, I have a lot more to choose from :-)

Bob, still working on his list.


My minimalist list...

$
0
0
With apologies to my friend Vic Tesolin    (PS buy his book) :-)

So here I go again, that dreaded list. You would think that being a small, rationalized list of must have tools, it should be easy.... But noooooooo...so many choices, so many easily mixed ups wants within the needs list...

OK so jokes asides here is my Ahem... Minimalist list of essential tools a la Bob

PLANES


Stanley Nos show or equivalent, metal or wood.  Totes when present, sized to your hands.
No 4 Smoother, supertuned
No 5 Jack, 1 spare blade ground with 8 in arc
No 6, or 7 or 8 Jointer
No 65 1/2 Low Angle block
No 71 Router
No 78 Duplex rabbet fillester
No 80 Cabinet scraper
Set of 3 Card scrapers
Scratch stock, with spare blades
No 151 Spokeshave
Small plow (Record 044 or Veritas), 1/4 in blade
Rasp

SAWS


Max or smaller length of handsaws,  according to your measures.
Handles sized to your hands, hang right.
Handsaw Crosscut 10-12 TPI Disston D7 or D12
could be a induction tooth hardened modern version, re-handled
Handsaw Rip 4-6  TPI Disston D8
Dovetail Rip 14-18 TPI
Carcass Crosscut 11-12 TPI
Coping, spare blades

CHISELS


Bevel edge 1/4
Bevel edge 1/2
Bevel edge 3/4 (Paring)
Bevel edge 1-1/2
Mortise 1/4 or 5/16
Gouge, incannel 1/2

MEASURING/MARKING


German knife No 8
Marking knife
Center punch
Marking gauge
Mortise gauge
Panel gauge
T-Sliding bevel
Combination square (Starrett, Brown & Sharp, Mitutoyo etc)
Machinist square 4, 6 in
Cabinet maker square 9 in
Dovetail marker
Dividers
Compass
Set of pinch sticks
Set of winding sticks
Straight edge
Torpedo level
Angle measurer gizmo

MISC
Claw hammer 16 oz
Carpenter mallet 16 oz
Warrington hammer 8-12 oz
Ball peen hammer 14 oz
Pincers
Nail set
Screwdrivers
Sand block

DRILLING


Brace 10-12 in (Stanley, Millers-Falls, North Bros)
Set of 13 Irwin bits
Handrill, Millers-Falls No 5 or equivalent
Set of Brad point bits up to 1/4 in
Drilling awl

SHARPENING
Set of three stones: Coarse, Medium, Fine (Any media or system)
8 in mill file
Set of saw files
Burnisher
Strop and paste
Side clamping jig (Eclipse)
Saw vise

JIGS AND APPLIANCES
Bench hook
Shooting board
Planing stop
Pied de biche (doe foot, notched board)
Saw bench
Workbench
Moxon vise
Hold fast, Qty 2
Bench dogs, Qty 2
Clamps, assorted and scaled to your work

Ok, so pretty comprehensive, yet I know I probably still managed to forget something obvious...
And yes, it could be reduced or extended :-)

Bob, going over his list Rev 5.3A1A


Exploring my minimalist list, part 1 the Bench planes.

$
0
0
For a so called "minimalist" list, it may seems at first to be a tad bloated with too many planes choices?


Lets go thru them and see what options we have, and why these made it to my list. Will also look at various options for various budget. The point being, you do not have to follow blindly any list, including mine. What you need to do is to understand why some of these tools repeat themselves on many such "minimalist" lists, in order to make your best educated buys.

Always buy the best quality tools you can afford, you will never regret it and will save money down the road.  You can save lots of money by buying vintage, but you must be aware of what to look for and: Would it be possible to put this hunk of rust back into a working tool?
Regardless of the way you go, new or vintage, you MUST learn to sharpen all your tools as required, yes including your handsaws... Don't panic it is not that hard...

And finally, we will look at various not so essentials tools to add for each category that will come in handy. But understand that these basic tool lists are based on the premise that you will be making mostly furniture type projects. Whatever directions you want to go in, say; Luthery, carving, turning or simply works at smaller or bigger scale, will have obviously an impact on your tool list.
For example, if you work mostly in smaller projects, a No 8 jointer or bigger is obviously longer than necessary, a No 5 would probably do the trick nicely.

And finally, borrowing from Chris's Coarse, Medium and Fine, concept, the number and type of tools are influenced by it.

So lets look at my plane selection closer. Prices, were indicated, are in CDN funds, rounded up, at time of writing.
Not responsible if prices of vintage suddenly goes up and become sought after :-)

Bench planes

These, using the Stanley nomenclature system, comes from the diminutive No 1 to the behemoth of a cast iron beast, the 24 in long No 8 jointer.
In the Stanley system, these are the No 1 (1-1/8 pound), 2, 3, 4, 4-1/2 Smoothers
The  No 5, 5-1/4, 5-1/2 Jacks
And finally No 6, 7, 8 (9-3/4 pound) Jointers

From L-R No 2, 3, 4, 4-1/2, 5, 5-1/2, 6, 7, 8, my 5-1/4 is MIA?
would have fit between No 4-1/2 and No 5

Pic taken with all heel of the planes in line 
to better show the sizes difference

In this older pic, No 5-1/4 is there but No 5-1/2 is missing, sigh!
I'm getting the idea that my jacks don't want to all play together!


So which ones do you need? One from each category would be all you need, which Nos will depend on physical attributes (size of your hands, upper body strength etc) and of course, what scale are you working on. Some planes can be customized with various sizes front knobs and rear totes. I highly recommend that you spend some times getting these sized correctly for your hands, and if your vintage one has a broken horn, DO repair or replace it. A well fitted tote in your hand makes a big difference in your planing experience.
If you are unsure which totes and knobs shape you are more comfortable with, I would highly recommend going to your near by stockist which carries the Lee-Valley new custom line of planes. Not only are these great planes, but you can try various shapes of tote and knobs to see which ones fit your hands better, brilliant idea! While you don't have to buy these, you can surely used their size recommendation to help you out, if you cannot put your hands on them.
And Pst, you can retrofit some of these on your Vintage Stanley and al...

When squaring stock, the first plane to touch the wood is the Jack (coarse), set for a coarse cut, preferably with a heavy curvature on the blade. I like to use a 8 in radius on my blade.
This should probably be your first plane purchase. A good old vintage Stanley ($15-$50 depending on Type and condition, my favourite being Type 11), grind the original blade with a 8 in radius. It does not have to be super sharp to work, so don't go nuts on it.
Buy a spare blade, preferably a good quality after market, such as Veritas blade / cap iron set for Stanley & Record. This one kept super sharp, transform your vintage jack into a good smoother.

From L-R 
NOS Stanley, Veritas (not No 5 size), Made in West-Germany Chromium Steel and finally the original Stanley SW blade for this plane

Ever wonder how long the original where? Now you know :-)
These are 2 in wide blades, for No 4 and 5 planes.
Imprint this image in your brain bucket, and refer to it when looking at vintage blades to guess how much life is left in them.

A quick word about swapping blades in Leonard Bailey design planes.
If you tried different after market blades you probably noticed that some don't seems to fit as well: the range of adjustments is limited, or the blade wont fit without opening the mouth etc.
These two problems are caused by two different things, the first one is due to the location of the slot to engage the blade advance pawl, the other to the thickness of the blade. Best way to avoid the conundrums with the blade advance pawl is to install the original cap iron on your new blade if you see that there is a noticeable difference in the slot location.

Notice the location of the slot for the blade advance pawl.
The first one on the left is from a Transitional plane, their slot is higher than the traditional Bailey pattern. Veritas is second from the right, it fit my Stanley's :-).
The first blade with the hole on top is pre-1895.

In order to reap the benefits of a smoother, you should spend some time flattening the sole and fettling the plane better than if you were to dedicated it to a scrub/jack.

Another option is to buy a Low Angle Jack, such as the Veritas LA Jack ($280) Add other bevel angle blades (about $42 to $50 ea) and you have a very versatile smoother AND jack / jointer rolled into one. Its mass also makes it a good performer for shooting. If only buying one premium plane, make it this one, it is a very versatile and excellent performer.

My LA jack in use on my shooting board.

Next plane to touch our wood is the joiner or jointer (medium). Its job is to flatten the stock by making it flat. The length of the plane in relation to the length of the piece of wood is key here, hence why it should be scaled to your work.


Although in the Stanley system, jointer stop at 24 in, in wooden jointer they goes to 30 in, and there is nothing to prevent you from making one any length you want.
Coopers (barrel makers) used a very long jointer, 3 to 4 ft long upside down resting on a bipod on one end and passing the wood over the stationary angled down jointer.

Home made joiner. Source  Sawmillcreek.org

Jointers all work by bridging the small gaps under their long sole, once you pull a full length shaving, you are as flat as can be. Well as flat as the sole will let you that is...

Lastly, the smoother (fine), thanks to its smaller size, is able to work localized spots to reduce tear out and such. Regardless of construction, wood or metal, its sole shall be flat, really flat in order to pull thin fluffy shavings.
If buying vintage, that one should be supertuned, fettled to your best efforts, in order to work as advertised. You have many choices here, from traditional wooden ones, to modern laminated construction to premium metal ones such as LV, LN, Clifton, WoodRiver V3 etc. to the sublime Norris types such as Sauer or Holtey.  Regardless of vintage or types these are only as good as the blade in it and how sharpened.
The bedding angle varies from roughly 40 to 55 degrees, the most often seen being 45. The higher the angle of attack of the blade (the frog angle in bevel down planes), the less prone to tear out it would be, but resistance to pushing it will increase. Skewing the plane can help. Also you need a small mouth (aperture).
Again, size matter to your size of work. A block plane can be used as a smoother so can the LA angle Jack...

Pics from LV site. 
Essentially what you end end up with is a miniature sized LA smoother

By adding a bail tail , you can convert some block planes into a small smoother. Stanley long ago made such a bail tail and now Veritas took the concept a step further by adding a rear tote and front knob ($38), essentially transforming a block plane into a No 3 size smoother. But realize that if you are into model making, a regular block plane, unadorned, could be performing as your smoother or jointer...

Usualy, to reduce plane tracks, the corner of the smoother blade are slightly relieved, while the jointer blade is keep square .

Block plane

You can do without, but it is very handy to have and because of its low angle blade bevel up construction, works great on end grain. Moistening the end grain with alcohol help, so does water, but alcohol does not raise the grain as much because it quickly evaporate.

BTW that steel block plane No 118 is pretty good, and 
you won't cry if you drop it from a ladder... :-)

Block planes comes basically in two types; Regular (20 degrees) and Low Angle (12 degrees). This refer to the bedding angle of the blade, which are mounted bevel up. This translate into easily tuned angle of attack by changing the blade bevel angle, just like our previous LA jack.

If only one, I recommend the LA variety and one fully adjustable: mouth aperture, lateral adjuster and depth adjuster. Stanley No 60-1/2 is the most common variety of these. Another option would be the No 9-1/2 (Regular 20 degrees). Basically a No 9-1/4 with the addition of an adjustable mouth.
These are probably the most produced Stanley block planes, hence they are numerous. Avoid incomplete or badly damaged ones.

How to spot a good block plane, take a look at the bedding surface, how big is the machined area.

Good Record No 060-1/2
Better Sargent No 5306
Best Lie-Nielsen No 60-1/2

And don't forget, block planes comes in a wide variety of size, use whatever is applicable to your type of work. A small sample shown below.

From L-R
Woodriver small chisel plane, LV little Victor, Sargent BL, LV squirrel tail , 
Lie-Nielsen No 60-1/2, Record No 0130

So what would be next? You could get different sized tools to expand your repertoire, but you would get probably more bang for your bucks by investing in spare blades. Just remember to pay attention to the slot location in the cap iron. If you do get spare blades, you should also invest in some sort of protective case or some means to store and protect these blades.

LV cases, pic from their site, about $3 ea

Veritas came out with two sizes of blade case. I like the idea so I bought a bunch, both sizes. It obviously fit their blades perfectly, but the larger ones advertised for the Stanley/Record types of blades does not fit them all! :-(
And forget trying to store your blades with the attached cap  iron, the box wont close. That was disappointing, but not entirely surprising. I own a ''large'' selection of planes and various blades makers, models and vintage etc. There is nothing standard about them. I wrote to them about it and am hoping that if enough people write to them, they may redesign their cases to fit blade AND cap iron... Pst, if you read this write to them :-)

The first one from right is a Veritas Stanley/Record replacement blade made to fit their case, look at the length difference between them all. The NOS blade besides it looks the same but it is slightly longer and the case wont close. The other are all too long


This post was getting too long, so I split it. Next will conclude our look at this plane category; Joint making planes, scrapers.

Bob, trying to raise his spirit by staying occupied

Exploring my minimalist list, part 2 the Joinery planes, spokeshaves and scrapers.

$
0
0
Joint making planes

These are the ones that makes quick work of making or tuning up joinery. Not necessary, you could cut all the joints armed with only a saw and a chisel, but they sure make your job easier and faster, hence why I consider them into my minimalist list.

Many joints are made up of grooves, rabbet and dadoes,
 sometimes in combination. 
The Dado Tongue & Rabbet is also called the drawer lock joint, which incidentally is the only other joints I consider for drawers.


Check out Terry Gordon make a whole drawer with only one plane!
If Terry name sound familiar, it is because he is the maker of HNT Gordon planes in Australia, reputed to be a fine wooden plane maker.

 Rabbet plane


From L-R
Stanley No 78, Stanley No 191, ECE rabbet,
 Veritas large shoulder plane

Rabbets are one very useful and fundamental joint. It can be used to accept a backer board, or glass. To fit a panel into a groove or be one part of a joint.
Rabbets planes comes in two versions, with the blade square across or with a skewed blade.

 Add a fence that slide under and you now have a Fillister plane.


Add a spur cutter ahead of the main cutter and now we have a dado plane, which also never have a fence. Without this spur cutter we would be tearing up cross grain, unable to make a clean cut. By severing the fibers ahead of the cutter action, we have clean walls.

The typical clover leaf spur cutter on numerous metal planes.
There are 4 positions and only 3 cutters, shown all recessed, none cutting.
To engage one, remove screw, rotate cutter (you got 3 choices), put back screw if you managed not to lose it yet... :-)
To sharpen these cutters work on the flat side.

On typical wooden dado plane, the cutters (1 on each sides) are made as one iron as shown here. Note the 2 small spurs sticking out just before the depth stop plate. Notice also the large distance between the spurs and the main blade compared to the metallic one. A dado plane benefit from a skew cutter since we are working cross grain. 

Only 1 wedge up front so both spurs are on the same blade. 
Sometimes, there is only 1 iron, or 2 separate irons/spurs & wedges.
What started as a simple rabbet plane, is now, with the addition of an adj. depth stop and a cutting spur on each sides, a Dado plane. 
They never added fence to them.

Here's the 2 cutting spurs on the same blade.
Problem: if you touch the outside dimensions of the blade, this plane is designed for a 3/4 in dado, it will jam
because the spurs are no longer cutting as large a path as the main cutter blade.
The two must be equal width, or will jam, make a mess etc.  

In a pinch you can use a shoulder plane to cut a rabbet, but its low angle and small mouth are meant to cut across the grain while trimming shoulders.
So while a shoulder plane could cut a rabbet, you would be hard pressed to trim shoulders with a rabbet plane. A shoulder plane is a fine tune up tool not a coarse cutting tool like the rabbet plane.

The shoulder plane above has its mouth opened but it is still a lot smaller than the giant one on that rabbet plane.

One of the most inexpensive and useful metallic plane in this category has to be the Stanley No 78. They are plentiful but try to get a complete one; includes the fence and the depth stop, in order to reap the full benefits from it. To buy these parts separately will cost you pretty pennies... More than you paid for the bargain you thought you had. But even without these two accessories, it is still a very useful plane, because it is then simply a Rabbet plane.

Stanley No 78 on top and the similar looking No 191
 which is a dedicated rabbet plane.

If you find one, the Record No 778 is a better tool, owning to its twin post for the fence. The Stanley 78 has a bad habit of having the fence droop no matter how tight you screw it down.

The Stanley No 180 (1-1/2 wide), 181 (1-1/4 wide) and 182 (1 in wide) are the same as the 190 series except that the 190s have a spur on the side, making them more versatile. Like typical rabbet planes, they have no fence provision.
One big advantage of metallic rabbet planes over wooden one is that they won't wear out and remains true to size.

Sometimes you need to tweak that rabbet width, and sure enough, they made planes for that task.

A wooden Side Rabbet plane
A modern take on the classic metallic side rabbet plane from Veritas

I frankly do not have much use for messing with the grooves width, it is easier to tweak the corresponding tenon or etc.

Small plow plane


From L-R
Veritas small plow, Stanley No 45, Wooden Yankee plow

I choose the smaller size ones such as Stanley No 50Record No 044, and Veritas small plow.
There are a multitude of options in this category, from the elaborate large wooden plow, to the diminutive metal ones. You could also substitute a Universal plane such as the Stanley 45 or 55, if you happens to be a masochist or just love mechanical contraptions, but honestly, the most used groove in joinery is a 1/4 in wide, 1/4 in deep groove, 1/4 in from them edge.
So yes, you could do easily with a fixed 1/4 in plane. You could make your own or buy such a wooden one either vintage, or new from a boutique maker.

The idea of the small plow is that it can accommodate a variety of cutters and can be adjusted for various sizes "grooves" be it scalloped or reed, flutes etc in addition to making plain square grooves, at various locations from the edge, so it is more versatile, but then you have to buy more cutters and etc...
The 1/4 cutter is by far the the one you will use most, so it is sufficient to start.
Just remember that ANY adjustable planes is only as good as how well it can secure its settings and have easy repeat-ability.

The best and easiest way to set such a plane is by using setup blocks

Set the fence to a 1/4 inch
Set the cutter from cutter tip to depth stop at a 1/4 in

Since the cutter I used the most is a 1/4 in, it is often left in, and the plane set for cutting a 1/4 wide groove, a 1/4 in from the edge, a 1/4 in deep.

Here is some instructions on how to use them by the Schwarz himself

Next you may want to add some various cutters, as you need them. And if you do, get some sort of means to gather and protect them. A fabric or leather tool roll is a good way.

Router plane


From L-R
Veritas miniature, Stanley No 271, Veritas large (No 71 equivalent)
and Sargent No 62.  
There is now a 4th size, the Veritas medium shown besides the 
Veritas small (No 271 size). it uses the same irons as the large one (71).

Regardless of how you cut a dado, be it with a stack dado set on your tablesaw or by hand with handsaw and chisel, this is the tool you need to make a flat even depth bottom.
It also excel at tuning tenon, the depth of half lapped joints etc.
They basically comes in two sizes (now four thanks to Veritas)
Start with the larger one, Stanley No 71 then later on, as need dictate, the small one Stanley No 271.
You could make a quick and dirty one using a chisel and a block of wood, but the Stanley form is preferable because of the cutting action. Typically the No 71 came with 2 or 3 cutters, the one I used the much is the Spear (pointed) cutter versus the square one. I find it work better in cross grain and allow me to get in corners for tweaking joints.  You can uses the Veritas cutters in the Stanley No 71 and there is also a fence available, which I don't think I ever used....

Notice the one of a kind height adj. thread on the Sargent cutter, far right.
The two Stanley cutters are different vintage. Notice the angle of the square blade is more than 90 to the shaft. I prefer the action of the spear shape one better, and it is more versatile.

Notice the two pieces construction for the spear shape blade.
It sure facilitate sharpening! Hint, put it on a stick...
In case you wondered, YES, the Sargent one had a user mod to salvage it as a cutter. They are unique and hard to find...

Next I would get the smaller one(s), they comes in very handy, depending on what you do. Great for inlays work, and talking of which there is now adapters for the Veritas large router plane that facilitate that task.

In addition we should mentioned that the large router planes have two holes in the sole, so that you can bridge wider area by adding a wooden sole to these planes.

SPOKESHAVES

These are like small planes with a very small sole. That makes them quick to tuned up. Just like planes take a good look at the bedding area in the metallic ones, it should be flat. A quick work with a file will quickly makes it right, as they are often painted over, rarely machined.
Some people fill the depressions area with epoxy then file the whole thing flat.
It reputedly help damping vibrations (Chatter).

A Stanley No 51 body. The two recessed area under the blade serve no other purpose than to reduce the amount of metal and the subsequent machining

But before we go too far, why a spokeshave? Short answer, unless you work with curves, you will get along just fine without one. But as soon as you venture away from everything square and rectangular, spokeshaves comes in handy...

There are basically two kinds, metallic and wooden ones. The two operate quite differently owning to their construction.

Among the metal ones, the Stanley No 53 and 54 are excellent tool, owing to their adjustable pivoting mouth, adjustable by the big top screw

No 53 has gull wings, while the 54 has straight handles.
If you look closely inside the body, these old Stanley had a machined surface, nowadays they just paint them over the rough casting tsk, tsk.

Traditional wooden ones uses a tang on each end held by a friction fit. 
They are adjusted by tapping on the tangs...LIGHTLY

Due to their nature, they wear out at the mouth area which 
basically kills them as a precision tools, but...

Either as a retrofit or from new, the better ones have a brass strip inserted at the mouth to negate that problem. If yours does not and has a big gappy mouth, you may be able to salvaged it by adding such a strip.

Adjustable ones in wood are possible, this is the Veritas kit

My all time favourite are the wooden ones. The low cutting angle action can easily peel away wood fibers. Traditionally, they were set with the blade askew. meaning that one post was up a smidgen from the other one. This translate into a skew cutter in relation to the mouth. You can then use one side for a rough cut and move over to the other side for a finer cut. Mind you that trick only works if your work piece is narrower than the blade, if not you just ends up with a tapered cut...

You will notice that the tangs are slightly tapered and being friction fit, it may happen that the hole in the wood body becomes too loose to hold the cutter tight. If/when that happens, try spraying a bit of  hair spray in the hole, just a small spritz, and suggest you check with your spouse first... Just saying :-)

Veritas came out with a metal version that duplicate the cutting action of the older classic wooden ones. You can find vintage Stanley of a similar models, but be prepared for sticker shock...

I specified the Stanley No 151 because it feature a simple mechanism to advance/retract the blade. Easier for beginners to adj. than by tapping the blade, posts, tangs etc. There are of course new premium versions from both LN and Veritas

If only one, I would get the flat version first, then add to your repertoire by adding various shaped ones as needed... if ever. It all depend on what kind of work you intend to do. But just for the occasional curves work, the No 151 will fit the bill nicely.

SCRAPERS


From L-R
Stanley No 80 (older), Stanley No 80 (newer), Stanley No 81, set of Veritas card scrapers, hand scraper.

The square shape above is newer, while the older one is below.

The Stanley No 81 has a rosewood sole 

And unlike the No 80, you cannot bow the blade to increase the cutting action.
The cutter is also a different size, this one is 2-1/2 in wide versus 2-3/4 for the No 80. Since the blade cannot be bowed, it benefit from a thicker cutter than the ones for the No 80.


Scrapers excel at taming wild grain, regardless of the direction you go at it.
I consider a good set of card scrapers a necessity. You are missing on too much if you skip these tools!  A set consist usually of three different shapes, allowing them to cover most anything you can throw at it...

My Two-Cherries set, German steel

I have no use for the various holder made for them, I prefer the flexibility of being able to quickly change the bowing action by hands as the need dictates. If your fingers are getting too hot quickly, try using one of those small business card's size fridge magnet promo items, it will insulate your fingers for longer. If you are still overheating, you probably should have spend more time with your planes first... What about wearing gloves you ask? Don't be such a wuss :-)

In many circles Sandvik scrapers are held as the best one, not only because of the famous Swedish steel, but because of the way they were prepared.
The Sandvik No 475 has now been replaced by the Bahco No 474 and like many good products, it has been outsourced, the newest ones coming from Spain and now Taiwan and not reputed to hold an edge for as long... :-(

Granted, cabinet scraper such as the No 80 or 81 are not essentials, but if you try to use a hand card scraper to do a tabletop, you and your fingers, will quickly appreciated it! Hence depending on the scale of your work, you may never need such a cabinet scraper. They are also sharpened slightly different than regular card scrapers.


Lastly, there are also scraper planes , but they are rather expensive, and you can get by with only the card scrapers. So add the cabinet scraper then the scraper plane if your work could used it. 

Just to recap: When finishing a piece of wood from rough to finish, the sequence would be Jack plane, jointer plane, smoother plane, and if needed to tame some unruly grain area, scrapers, followed by a light sanding using a block. I used 220 grit, just to blend in the plane tracks, scraped area etc. Also, because the planes and scrapers leaves a fine polished and burnished surface, some woods requires   
a light sanding to opened up the wood pores to accept stain.

SCRATCH STOCK

LV wooden scratch stock

We could argue that such a tool has no place in a "minimalist'' tool list, but it is such an inexpensive and versatile tool that I thought it should. With it you can add a decorative edge like a small bead (for bigger bead a beading plane would be better), flutes and etc. You can buy separate cutters or make your own with a blank and a file.

Once your profile as been cut by your files, simply hone the flat sides to maintain its sharpness. Easy Peasy. You can buy a metal ones such as the Stanley No 66 or the new reproduction from LN, or a copy of an old Preston one from LV 
or a wooden one again from LV
There are also very simple to make with a piece of scrap wood, so there are really no good reasons not to have one in your list... :-)

Next I would start to add moulding planes; Hollow & Rounds, beading planes etc
You don't need the full set, just get the ones you need as you go.
2 or 3 of sizes within your scale of your work should be fine. Unless you do lots of mouldings...

RASPS

Depending on grain size, they could be considered coarse, medium or fine tools.
A good hand stitched rasp is so much better than a machine made one with their identical rows of teeth.  The small randomness of hand stitching is what makes them cut much better and finer. Being hand made they are rather expensive ($100 and up) but they are well worth it.
Auriou and Liogier are two excellent brands, but the good news is there are lots of less expensive options.

My new favourite is the Japanese saw rasp from Shinto. A two sided tool (coarse and medium). You can save a few bucks by getting just the blade without the holder.


Nicholson used to make the excellent No 49 and No 50 Cabinet maker rasp but sadly like most everything they make these days, they are now crap. The good ones were made in the USA the new ones are from Mexico and China, definitively not made of the same steel!

There are a few good rasps from Italy, Czechoslovakia and other European makers. For a file or rasp to work as good as it can, the steel must be good quality and smooth before they raised the teeth.

I have seen various really cheap ''rasp looking tools'', definitively hand stitched from China and etc but I have no experience with them.

There are also numerous kind of files which can work on wood and leave a good finish. See these Japanese Mill tooth files. as an example.

Look at the fine steel surface in the uncut area, that's a sign of a good file/rasp.
BTW if you come across a red tang file in your rust hunting, have a closer look, it is probably a vintage Simonds file, excellent ones.

NOS Simonds Multi-kut, leaves a fine surface. 
The secret is in the diamond like cuts.

Whatever kind of rasp or file you get, make sure to get a card file to clean them. They don't work good once clogged and rust is sure to start if they are clogged so please take care of them. Protect them in storage, don't let them bang around each other in storage etc. Like any files, rasps work on the push stroke, don't drag the teeth on the return stroke, the teeth will last longer. Good ones are not cheap, be nice to them...

Next part we will look at saws and chisels

Bob, wishing you the luck of the Irish. We could have used some of that :-(

Saws and Chisels selections

$
0
0
In the saw department I had selected 5 saws, lets see why.
This selections offer various options for every budgets and preferences.


HANDSAWS

Handsaws are required to break down your stock to rough size, job that would be normally done with a tablesaw or Bandsaw in a power shop.
Cutting along the grain (Ripping) and cutting across the grain (Crosscut) are
2 different operations and required different tooth geometry to function properly.
Hence why as a minimum you need two different saws... or do you?

If you go with a Japanese saw, you can get both tooth configuration on a single blade.

Japanese Ryoba saw. Pic from Woodcraft

If you go down that route, remember that Japanese saws cut on the pull stroke versus our Western saws which cuts on the push stroke. That means appliances such as bench hook and miter blocks would be reverse. I.E. the fence would be forward instead of in the back. Also don't go nuts, even the Hardware store or Big box variety would be just fine, just make sure to get one with a replaceable blade. Unfortunately, the same cannot be said about western saws available at the hardware store, with perhaps one exception...

Those pesky one with blackened tooth line, you know the induction hardened ones? You can get a very good inexpensive crosscut saw with one of those awful ergonomic handle. But you don't care about the plastic handle, you are a woodworker, make a new handle if you must!

At 20 in and under most of these are panel saws, some like this one, 
have special tooth geometry that purposely handles rip and crosscut.

I carry such a saw in my car for the odd trip to the lumberyard where I need to cut something to fit inside my car.
I am not saying, by any stretch of the imagination, that these hardware stores saws can replace a proper western handsaws, au contraire, but you could get by in the crosscut dept until you can afford a better one. At which time, you can relegate that one to the garage or trunk of your car :-)

You can go full blown and buy premiums saws like Wentzolf, Bad Axes or Lie-Nielsen for example or you could go the vintage route and buy a few good saws for very little. Disston (old ones, before the 50s) Atkins, Shurly Dietrich, Simmonds etc are all very good saws. Look for a straight plate and decent looking tooth line (not bungled up by poor sharpening)
In addition buying a few saws at fleas markets etc for real cheap gives you practice saws for sharpening. Try sharpening rip saws first there are lot simpler.

My favorite rip saws are Disston D-8, 5 TPI very aggressive, fast rippers.Cross cut something around 10-12 TPI offers you a good compromise between speed and a smooth finish cut.

Next I would  add more saws and tuned them, some for hardwood, some for softwood. But before you do you need to become more proficient at sharpening them.

Dont forget the all too important fit for your size: Handles and plate length and the hang 

One last thing, if you don't like ripping long piece, buy a Bandsaw! More versatile than a tablesaw and safer... There, I said it! :-)

BACKSAWS

A good dovetail saw and at least one good crosscut backsaw of the Large Tenon or Carcass saw size will see you thru most of the joinery you will come across. Like I said in the joinery planes section, you could cut all the joinery with these two saws and a chisels.

As far as the dovetail saw is concerned, again, it should be sized to your scale of work. From the small Zona razor saws to the regular sized Western dovetail saws. Or in Japanese saw, that would be called a Dozuki saw. Proper dovetails saws are sharpened for a rip cut.

My diminutive Zona model maker back saw with its mitre box, very handy.
About $15. Zona makes great saws, highly recommended 

Again assuming we are concerned primarily with furniture projects, a good Dovetail saw is a must. The first premium saw I ever bought years ago was the Lie-Nielsen dovetail saw (US $125) and I never regretted it.


Today there is a variety of small boutique saw makers making great saws and Lee-Valley came out with a new line of molded spine back saws which are superb and rather affordable.

The whole set of Veritas saw is $265,  about the price of one premium saw.
Don't be put off by their look, some likes it some don't, these are great saws.
Pic from their site. 

CARCASS OR TENON SAW

Sometimes the terms are used interchangeably, small tenon saw or carcass, since they are roughly the same size at about 14 inch.
This one should be sharpened cross cut and leave a fine finish for joinery, about 12-14 TPI should do the trick.

Going vintage you could buy all the backsaws you will ever need for a real good price, but unless you are proficient at sharpening your saws I would pass on these for now as "working tool" but if you come across them for a good price, I would buy them for further rehab projects once you no longer feel intimidated to sharpen your saw.
Yes, you could send them away to be sharpened, but then you negate all the savings and would be better off to buy new ones.

FRAME SAWS

Note that in the handsaw dept you could instead gone with a traditional European frame saw, change the blade and you can go from Crosscut to Rip cut.

COPING SAW

Unless you happened to have a bandsaw, a coping saw would be very useful to cut circular forms and to clean up the waste in between your dovetail.

Most modern ones to be found at your local hardware store or big box store are crap, due to their frame not being rigid enough.
Vintage ones like Disston and Millers Falls are pretty good. If you want to splurge for the best one, buy a Knew concept saw.

Disston No 10B

Millers-Falls No 43

Knew concept Fret saw

Bonum Fret saw, W-Germany


So between all these choices you can accommodate pretty well any budgets.
Next I would add a fret saw.

CHISELS

From L-R
Record/Marples 1/4, 1/2, 3/4, 1-1/2 in
Narex 5/16 Mortise chisel, Unknown French maker gouge

First thing first, stay away from buying set of chisels. You will just be wasting your money. That is even more true with carving tool sets...

Since you only need a few, put the money you save from not buying a set into one very good chisel, the best you can afford.
New: Lie-Nielsen, Blue Spruce etc.
Vintage: Stanley No 750
Record Marples M444 Blue chip are pretty good inexpensive chisels if you can get past the plastic handles :-)
But be careful, they are now labelled IRWIN and are coming from East Asia, definitively NOT the same steel used in the old ones. Beware on EBay!
Swedish chisels have a good and well deserved  reputation, such as Berg and etc. but they too suffer from the same recent outsourcing craze and drop in quality.

You will find Bevel Edge (BE) chisels and firmer type chisels, the BE are more practical if you do dovevails, which you should learn to do, right!

Left Bevel Edge chisel, right Firmer chisel

The 1/2 chisel is probably the most used, so start with this one, you will also need a smaller and a wider one, depending on the size of your work, 1/4 and 3/4 should do.
I specified the 3/4 in as a paring chisel, because having one is not a luxury but a very useful thing, but you don't **Need** a paring one... well, maybe...oh heck just buy one!
The difference between a paring chisel and a regular Bevel Edges (BE) chisel? The paring chisel is not meant to be struck with a mallet but pushed by hands only, hence the blade is thinner and the handle not designed to be struck.

Paring chisel on top, BE chisel bottom.

Paring chisel have a longer and thinner blade.

You should have at least one large chisel, between 1-1/4 and 1-1/2 in or so would be good. Make cleaning up the side walls of mortise easier, or tweaking tenons and etc.

MORTISE CHISELS

While you could cut all your mortise using a regular BE chisel or firmer, it is easier on both yourself AND the chisel, if you use a proper mortise chisel. Why?
Because there is a lot of levering the waste out of the mortise, which is why mortise chisels have much thicker cross section to resist bending or breaking.

From Top to Bottom
Pigsticker without its handle, another pigsticker with its proper oval handle,
Narex mortise chisel, Sash mortise chisel (light duty) and finally a special tool top clean up the bottom of mortise, a Swan neck chisel.


My favorite mortise chisels are the old fashioned British form known colloquially as a Pigsticker. The shape of the handle let you know instinctively where the cutting edge is in relation to your hand. You can sometimes find them without their handle because they are meant to be whack on and the handle will eventually split on you. No biggie, make a new one. Oak and Ash seems to be the most common woods used on them.

Truth be known, you will mostly use only one size, the 1/4 in or the 5/16 in, since we work mostly with 3/4 in thick woods. So save your money and only buy one of these. Its been a long time coming but you can now buy new ones from Ray Iles  Narex make great, well priced mortise chisels

GOUGES

Something else we could argue has no place in a "Minimalist list", but to my thinking it afford us more tricks in our repertoire. Armed with one of these you can used it to trim inlay pieces, trim moulding pieces to fit by coping them and etc. Lots of bang for your bucks.

They come in basically two forms, incannel and outcannel.
Meaning the bevel is on the inside (incannel) or on the outside (outcannel) like the majority of carving gouges. What's the difference? If you use an incannel gouge and plunge straight down, only the outside of the cut would be true to the gouge curvature the inside would be taper, and vice versa.

Outcannel gouges are much more plentiful out there, which gives you some ideas about which ones are used the most...

A joiner gouge (R) is slightly different than a carving gouge (L)
The carving ones are thinner and ligther. 
These are both outcannel as seen from the bevel on the back edge  

Front side of both
 
Which sizes? 1/2 in is a good starting point, and depending on your type of work, maybe the only one you will ever need. Remember that you can cut a bigger circle with a smaller gouge than vice versa.

Bob, the toolman arg arg

Measuring and Markings tool selections

$
0
0
This is one category where all the money you saved on the saws selections would be spent!!  You cannot skimp on these tools, you rely on them for precision.


SQUARES

I don't know what you call a square that is not square, but unless it is, it is useless under any name!
 The Combination square is one of the first square you should get and it MUST be precise. That means forget about all these El Cheapo imitations at the Big Box store or hardware store and get yourself a real one.

Starrett is a brand that get mentions a lot everywhere and for good reasons.
Starrett tools were never cheap but you are paying for precise machining and a tool that will outlast us all. Other machinist precision brands are Sharpe & Brown, Mitutoyo and etc. Forget Stanley, Johnson and Empire etc.
A good 12 in Combination Square will cost you about $100 but it is worth every pennies.

My 50+ years old Starrett, still perfectly square since the day it was made.
Ruler is a bit dark, but I rarely used the markings if ever.

Cast iron head, not poly carbonate, or glass filled or aluminum and etc.
Low sheen finish on the ruler, etched markings, precise machining of the slot and pawl so that the ruler slide easily and lock square every times.
Why 12 in? Because it also double as a straight  edge, a precision ruler etc.

TRY SQUARES

Forget these nice looking rosewood handled square, they are often only "square" on the inside of the square and not on the outside, it will bite you eventually....

Here is your first clue, the brass edge is **Only** on the inside

Get yourselves some Machinist metal square. Often called Engineers square.
Look for BS939 Grade B. That means British Standard 939 and Grade B is not as precise as true machinist squares (grade A) but plenty good for our woodworking. The specs are less than 0.001 in deviation per inch over the full length of the blade.  And since a small 3 or 4 in is the one used often we are well within tolerances for working wood... we are not machinist but woodworkers.

These are Groz. Made in India, BS 939 B inexpensive and plenty good,
But regardless of which brands or how old, always check them regularly.

DOVETAIL MARKERS, SADDLE SQUARE

Not a must, but sure makes your layout faster and easier
There are various styles, you can easily makes one with a piece of scrap wood, but I really like these saddle squares from Veritas. Makes transferring your line across two faces so much easier. I also used the saddle square and the mitre saddle which I also used as guide to pare my 45 degrees with a chisel on small stock.

They make  a whole series of these in various angles
Myself I used 14 degrees for most everything

Another type of dovetail marker.

Other considerations:
Woodpecker has been making a series of "red" tool which are pretty good, Ralph swear by them.

Another tool which is very handy in the square dept is the Veritas Cabinet maker square, very handy. Just ask Ralph...


SLIDING T-BEVEL

These simple looking tool are very handy but can be frustrating in use... because of the blade locking mechanism.
Ideally once locked you should be able to lay it flat on both sides, most don't.

Those that lock with a lever, even with the area recessed, 
don't lay flat on this side

Forget about laying flat with a big knob sticking out

The only ones that can lay flat on both sides are the ones that use a locking mechanism at the butt end, providing the nut is not bigger than the stock.

This Millers-Falls "Buck Rogers" lays flat

So does this Disston, except that the wing nut is a smidge bigger and depending on the locking position it sticks up a bit. I can easily work around that.

Sliding T Bevel are very handy and you should have a "few" on hands. That way you can leave one set at a given setting throughout a project or check your drilling angles from two directions etc. Here is a new and inexpensive T-Bevel that lock on the butt.

WINDING STICKS

A must when flattening stock with planes, but regardless of how you are trying to flatten your stock with machines or by hands, you need these to check for twist.

Veritas winding sticks

You could make you own out of wood, or buy commercial ones such as from Veritas, but you could easily save yourselves a few bucks by buying a piece of extruded angle anodized aluminum at your local hardware store for a few bucks, cut it in half and voila! a rugged pair of winding sticks.. Perhaps use a black marker to make the top of one of your stick stand out more and you are good to go and would not cry if (when) you will knock it off your bench :-)
In addition by using them inverted (resting on the two edges) they are very stable.

MARKING GAUGES

You cannot have too many, just like Sliding T-Bevel and dividers.
At a minimum you need two types, which are sometimes incorporate into one tool. A marking gauge and a Mortise gauge.

The marking gauge as a single pin, whereas the mortise gauge has a fixed pin and a movable one.

The traditional British mortise gauge often comes with a fixed pin on one side of the beam (the marking gauge) and two pins on the other side (the mortise gauge)
They also often feature a recessed screw to lock the beam, requiring the use of a screwdriver whereas the American ones used a wing nut type of screw.

Stanley No 76 mortise gauge

Featuring a special plate to be able to trace around curves

Typical screw recessed locking screw on British gauges

A modern Veritas wheel gauge, first generation.
To cutter does not recess into the head, nor is there a flat on the head to prevent it from rolling around. Both problems are fixed on the new ones.
I get around that by dropping it in one of my bench dog holes when in use.

Pin or Wheel gauges? I have and used both, the wheel types are able to scratch a good line cross grain, easier than a pin, but have more of a tendency to follow the grain when used along the grain. Proper holding techniques can easily overcome that tendency. Wheel types are also easy to sharpen, just rub on the flat side.

Micro adjust one such as the Tite-Mark and the redesigned Veritas are very nice (insert drool here)

DIVIDERS, CALIPERS AND COMPASS

A must in the shop. They come is various sizes, usually in 4, 6, 8 inches and bigger. You need a least one and preferably a few, again to leave them set throughout a project. This is one tool where buying as a set can save you some money.

This is a 8 in set

Stay away from cheap kindergarden type compass and buy yourself a good solid one. at least in the 6 to 8 in range or bigger.  For bigger circle you are better off with a set of trammel points.

This is what I meant by Kindergarden set :-)
And yes, that was my first kit as a kid, which somehow survived me...

My next set as a teenager, also survived me and is still in use.

My regular shop one, notice the perfect use for 
those small pencil at the Lee-Valley store to write in your order...
Oups you are supposed to leave the pencil at the stores :-)

Trammel points set. you are only limited by the length of the bar 
which you can make any size you need

MARKING KNIFE

Another essential tool for making precise marks AND setting the stage for the chisel or saw to follow. A true marking knife has only one beveled face, the flat face is riding against the ruler, square or whatever.

Paul Beebe marking knife. Good all purpose knife but the blade
 is too thick for some uses such as small dovetails

Czeck Kerf Kadet knife. Pricey but I love it. Good balance, 
nice thin and long blade sneaks in everywhere

Crown small awl. Some prefer to use an awl to strike marks, 
but I prefer the cut edge left by the knife

Recently Lee Valley came out with a great marking knife, nice thin, long blade in a glass reinforced plastic handle, inexpensive and great buy. If you are starting, and don't have any, buy one!

Beside the marking knife, I like to use a shop knife to deepened the marks left by the marking knife to help register the chisel or saw plate. You could also used a chisel to do that, but a good shop knife quickly becomes indispensable.
My all time favourite is the German chip knife No 8.

Technically it is a carving knife, but I just love the way
 the handle fit my hand and the balance

CENTER PUNCH

There are many such punch and variations, but I like a good automatic punch. Put it where you need it, depress the top and it fire a spring loaded tip to leave a mark. So handy, to me it is indispensable and do belong into any minimalist tool list. Perfect to ensure you are drilling right on the money...

Automatic punch


RULERS AND TAPES

I prefer a rigid ruler to a tape measure any day, but a small tape comes in handy, especially when measuring your stock and getting the rough cuts set up.
When I says small I mean around 10-12 ft should be plenty long. Larger ones such as 25 ft are more for carpentry than woodworking, beside why carry around the extra bulk and weight!

Or for the ultimate in compactness carry one of those in your pocket.
That is a 6 ft tape... Yes it is a replica of an antique.

I used both metallic and wood rulers. Metal ones should have their markings etched then ink filled for durability and legibility. You want a low sheen or the glare will get you :-)

I just love folding rules, vintage ones are a crap shot at times, but they now have started to make them again, yeah!

Traditionally woodworkers would carry a 2ft, 2 fold rule and a long Zig-Zag type for longer distances up to 8 ft. My Zig-Zag rule has a brass slider on one ends which is very handy.

Rabone No 1167 2 ft,  2 fold rule.
That one has "Blind man" markings, big ass numbers for old guys like me :-)

Lufkin X48 Red ends, 8 ft rule with a brass slider

Other handy rules to have around would be a good pocket clip 6 in metal ruler


And a center finder rule. I don't know how I got along without one all these years before, soooooooo handy to have.


In many instances you don't need to know the exact measurement, you just need to know if an opening, or assembly is square or a set reference length. A simple pinch sticks will act as a Go-Nogo gauge and is a lot simpler to use than trying to measure the diagonals of an assembly at glue time. You can buy the hardware at Lee Valley or buy a complete unit at Woodpecker or Rockler or you can simply make your own. Very simple, but sooooooo handy.  What size? Sized to whatever your needs are.
A pair of these in two different size should handle the vast majority of your needs.

The Veritas hardware for making a pair. I already have one made, this is for another sizes as a one day project, someday...

Finally since the world is not flat, you need to be able to find level and plumb, and sometimes you need to determine what are all the angles you see :-)

LEVEL

For woodworking a torpedo level, about 9 in long is all you need. The 2 ft and 4 ft etc are more suited to carpentry and house renovations.

You have the choice of a glass vial or electronic version. Heck you can even download one of the various Apps for for Smart phones that will turn your phone into a handy level.

Good old fashioned and reliable glass or poly vials

Electronic. You don't even have to look at it, it beeps when level is reached.
Have this one for over 20 years now, and my wife is constantly stealing it for leveling pictures :-)

A pint of beer makes a very handy level...until it is empty of course :-)


ANGLE FINDERS

There are numerous tools out there that would fit the bill, from the simple plastic angle protractor found in any drafting kit to the various digital gizmos available.
Whatever you get, get one that you can read easily and adapted to your job.
For example you would be hard pressed to check the angle of a blade in a tablesaw armed only with your drafting set Angle protractor!!

Inexpensive plastic angle finder. Pretty good but maddening at times trying to remember how to read that darn thingy...Save the instructions :-)

Heck of a lot easier to read, no instructions required :-)

Love this little digital gauge, I find new uses every day for it. 

While you could easily make such a board with an angle protractor, you can buy an Bevel setting board. It is very handy to have.


Next I would add a set of setup's blocks. They are not only handy they make setting up tools and cuts so easily and precisely without trying to decipher small strange markings (you know those pesky metric thingy)
I had to exert great control not to include such a set into this minimalist list. That how much I rely on them all the time. The thing about measurement accuracy and transfers of those numbers on various devices is: Every time you measure or read a distance,you introduce errors. By not trying to measure anything by using Go-Nogo gauges and known dimensions blocks, the actual "measure" is very accurate and easy to duplicate over and over without errors.

This is the basic (starter set). It is the one I used all the times

I like it so much, when they came out with expansion sets, I bought them too.
This is the 1/16 expansion kit and the 1/32 set with the starter kit.


Another great tool which work in a similar fashion, is a taper gauge.
That in effect spread the measurements out for easier reading.


So by now you may get the idea that I don't like to take actual measure, and if so, you would be right...

Bob, who doesn't like to be restricted by imperial or metric measurements. I am a Free Range wooodworker you hooo

Drilling and fastening selection

$
0
0
Tools used to put stuff together, and sometimes to take it apart.


MALLET

There are a variety of choices as far as mallet used to strike chisels are concerned, but they should be kind to your chisels. That is why my favorite chisel basher is a traditional wooden carpenter mallet. 16-20 Oz is big enough to drive your biggest mortise chisel.

They come in a variety of sizes, 
use one appropriate to your work

Another one I like is the Veritas brass carpenter mallet. I like the heft of it and the fact that it has replaceable wood striking faces

Veritas Cabinet makers mallet


Another good choice would be the traditional wooden carving mallet, which you could turn if you have access to a lathe, or know someone with one.

From L-R 
The newer polyurethane lined carving mallet, 
and the traditional turned wood mallet

HAMMERS

Claw hammer

Typical Claw hammer

Not so typical Ripping hammer

A good old claw hammer 16 oz would serve you right and you probably have one of these already. Wood , metal or fiberglass handle? Totally up to you.
These three variations on the handles are all for the same reasons: How to prevent the handle from breaking and how best to absorb vibrations.
I prefer a wooden handle follow by a good fiberglass one. Word of caution, not all hammers in these three styles are created equal. Get a good one.

If you already have one, use it until you are ready to upgrade to a 21st century magnesium one with built in laser so you know exactly where you are about to strike :-)  But on second thoughts, keep the one you have until you break it.

Warrington Hammer

Feature a wide tapered peen. Also makes a good plane's hammer.

This design allow you to sneak the peen between your fingers when you hold something small like a pin or small brad. When I first read that, I thought, yeah right, I'm going to smash my fingers. But lo and behold it does not take long to get accustomed to it and it works as advertised. Perhaps not necessary, but very handy.

Ball Peen hammer

Ball peen and Warrington patterns both comes in a variety of head weight.
Start with one in 8-12 oz range and add as your needs dictate.

Also called a mechanic hammer. Even if we are woodworkers and not metal bashers, there is a multitude of tasks around the shop where it comes handy.
Eventually, you will need to perform the odd metal working jobs as you start to make your own tools and it is the right kind of hammer to drive pins in and out on tools and machinery.

NAIL SETS

Stanley nail set

I shown two types, the regular set most of us a familiar with and a new comer on our scene, the Japanese type. It is very handy as a small anvil to straighten nails and etc. Also take a look at the head, it allows you to reach inside assemblies such as carcass. Very clever simple design and oh, it also work great to countersink nails :-)

Inexpensive but very handy Japanese nail set

Next I would add a small anvil unless you happen to have already a mechanic vise with a built in anvil surface.

Small portable anvil, very handy.

My Record No 100 does not have an anvil surface. 
DO NOT use the rear movable piece as an anvil

My Record Autovise No 74 has a small anvil in the back

NAIL PINCERS

Technically a end cutter as opposed to the common side cutters.
These are used to pull nails or to cut them almost flush with the wood surface.
Easily modified on a bench grinder into a flush cutter or tapering one side for easier reach on the nail head.

A pair of cheap (Cheep for Ken) end cutter used as a nail pincer.
You want a rounded head to be able to rock the nails out

Typical side cutters


SCREWDRIVERS

The majority of us probably own various sizes and types of screwdrivers so why specify this type? Because in woodworking, the common screw still reign supreme and to be able to drive it down below the surface, without damaging the surrounding surface, you need parallel edge and a non taper end will seat better in the screw slot and prevent cam out. So regardless of how big your collection of screwdrivers is, I urge you to get a proper set of screwdrivers for woodworkers.

For some reasons I could never figured out, the classic British pattern has always been expensive, even more so on the vintage market.

Marples set in 4, 6, 8, and 10 in. There is also a 3 and 5 in 

 But there are lots of alternatives, even as a set of 1/4 in hex drive replaceable tip sets. What you want is a parallel tip, not flared out

Moores & Wright ratchet screwdriver, parallel tip 

The type to avoid, the common variety with flared end tips

BORING TOOLS


Making holes in the fabric of time... Huh? Well Yah, you try to make a hole without these tools and see how long it takes you :-)

A good brace, a handrill and a reaming awl, will handles the majority of your holes making needs. Again size is everything, if you are into making post and beam construction, then a post beam drill should be a priority, if not, you will probably never use one.

BRACE


Your typical ratchet brace with a Barber chuck, Millers-Falls

Most braces will be found with a 2 jaws chuck, just what 
you need to hold securely the tapered shank bits.
Not so good with round shanks.

Some braces have a three or four jaws chuck, 
which hold regular round shanks much better

Even a non-ratchet brace would be a good buy.

When you start using brace and bits, you quickly realize that there were no standard for the tapering shanks, as a results some brace hold their bits better than some others. The Spofford or Fray brace excel at holding them all due to its unique construction. Pretty well bomb proof construction also...

Stanley Spofford (yes, Stanley bought them) brace

The unique split case held by a large thumbscrew 
can hold every tapered bits I can throw at it


And of course how good is a brace without the bits...
The most common and popular bits are the IRWIN and the JENNINGS types.
Although I very much like my center bits, Irwins are a lot much easier to come across.

Irwin bits, solid core. More sturdy than Jennings

Jennings bit, bit is twisted around its axis to form the flutes.
Because the flutes are closer together than on Jennings, they tend to bore truer

Which ones you get is strictly a personal preference and depends on what is available to you. Brace bits are normally sized in 16th of an inch. Thus a bit stamped No 4 is 4/16 or 1/4 in, up to 16/16 = 1 inch.
What you want then is preferably a complete set of 13 bits, No 4 to 16.

HANDRILL

For smaller holes, a hand drill or a push drill is what you need.
Of both types, the handrill is much more plentiful owning to the fact that practically every household in North America had one in the days prior to the advent of the electric drill.

The iconic No 5 from Millers-Falls is probably the most plentiful out there followed by the No 2.

Typical No 5 as found in the wild. Not so typical is the fact that 
the often missing side knob is present on that one.

Not having a side knob is no deal breaker but should be reflected in the price.

These takes your every days round shank's bits. Their chucks usually take up to a 1/4 in or 3/8 in for the bigger models. 
I keep on hand a small set of LV brad point bits, 12 bits from 5/64 to 1/4. Not cheap about $60 but well worth the price. Of course regular twist bits will work just fine.

PUSH DRILL, GIMLETS AND SQUARE AWLS

For smaller holes, these three types of tools are what it is called for.

I did not listed the push drill but it is a very handy tool to add to your arsenal.
My favs are the Millers-Falls Buck Rogers No 100 and the Stanley No 41 variety. They both came with a set of 8 bits. Note that they are both also using proprietary bit shanks design, you cannot interchanges them. Keep that in mind as you look for a vintage one.


GIMLETS

Although the Square awls make small holes effortlessly, I was surprise at the small size of the Veritas chisel point awl  Work great for those small screws for some hardware, but so small I'm almost scare to break it.
I would then recommend a small set of gimlets in addition or instead of  that square awl.
Note that they do make bigger stronger square awls.

Gimlets comes in slightly different forms but all works the same

My Veritas small drilling awl


 Later additions

A good depth stop is handy, although at the speed we are drilling by hands, the piece of tape trick work great and is in no danger of being damages by drilling too fast :-) 

There are various patented design to work on brace bits, 
this is the one I used.

 A good set of cordless drill and impact driver is very handy... and they are still a cordless tools :-)
Stay away from NiCad battery technology go with Li-Ion and go with a 18-20 Volt range. Compact and more than powerful enough. If money is still plentiful try the new Brush less technology.

Bob, making holes in people theory since 1956

Sharpening equipment

$
0
0
Continuing our series on my minimalist tool list.
All the tools you have been busy acquiring since I started this series would be quickly rendered useless unless you have a meant to keep them sharp.


SHARPENING EDGE TOOLS, CHISEL, PLANE IRONS ETC.

First understand that it DOES NOT MATTER which system you use, oil stones, waterstones, diamond plates, scary sharp (sand papers) etc THEY  ALL WORKS.

If you already have some money invested into one of these system, keep it.
If you are starting from scratch, pick one any one and stick with it.

Understand also that there are three steps required to bring a tool cutting edge to be sharp.
1- Grinding
Could be done on your coarsest stones or sand paper or with a grinder, handcrank or power.
2- Honing
Must be done UNTIL a burr is formed on the other side. Most people stop before they achieve that burr across the WHOLE edge and as a result, will never achieve sharp.
That step is accomplished using your medium stone (roughly 1200 in waterstone, Black Arkansas in oil stone or roughly 320 to 600 in sandpaper)
3- Polishing
Were we cut the burr and refine the edge. Use your finest stone.  I stop at 6000 on my waterstones with a Nagura stone then I strop it.

This commercial strop has a shaped edge to handle my carving gouges

Shop made with a peel & stick micron sandpaper.
A good source is from Fiber optic technician, they never reuses their paper and there is a lot of life left in them after they just polish the end of the fiber.
Or... you can buy them :-)


In the above pic the polished ceramic tile is for using sandpaper, and setting the bevel flat on the plate.

The super flat surface (more than flat enough for our needs) is also great to set flat the bevel on our tools in the side clamping jig, if you do not have a setting jig or want to duplicate an existing odd ball angle. Spritz water put on a piece of sandpaper and go to town. I don't use spray glue.

The hand grinder is but one example and then there are my two most used waterstones, 1200 and 6000, which BTW you must use with a Nagura stone to achieve best results..

There is a lot of controversy and strong opinions when it comes to sharpening.
All I have to say about using a jig for holding your chisels and plane irons is that it will get your sharper, faster. Why? Because repeat ability and consistency wins the race...every time.
I don't see it as a crutch, and yes, I am proficient with free hand sharpening without training wheels, but I still used it to get me there faster, period!

And talking of sharpening jig, I much prefer the side clamping jigs like the Eclipse over any that clamp from the top of the blade such as the Veritas jigs.
The Lie-Nielsen appears very nice and etc. but it is way too pricey for my taste and needs, so save your money and get a cheap clone of the Eclipse, they are everywhere and all seems to come out of the same factory (?)
They are not perfect, what do you expect at that price point, but they are very serviceable and easy to tweak, see how I do it here


Such a side clamping guide benefit greatly from the use of a simple setting jig to get consistent angle set


Finally you NEED a place set up to be able to sharpen without having to clear everything to make room. The easier it is to stop and sharpen, the more often you will do it and your tools will stay sharper and your sanity will benefit also :-)
You do not need a full blown dedicated sharpening bench but make yourself as a minimum a board of some sort to hold your stones and etc.

My temporary set up on a re-purposed bedside table using 

SHARPENING SCRAPERS

You need a mill file and a burnisher. DO NOT skimp on the burnisher and forget stupid ideas about using a router bit shank, screwdriver shaft and whatever.
You NEED a proper burnisher. They come in various shape and profile, I use my Veritas ones, work great.

From T to B
Veritas small carbide burnisher
Veritas Tri-Burnisher
Home made burnisher made from an hardened rod inside a Xerox photocopier

Requirement of a good burnisher, a smooth and hard surface, harder than the steel used on the scrapers.

There are a few special holders to help you get a consistent burr angle, but I never used one, so cannot comment on their efficiency.

The mill file, about 8 in, is used to remove the old burr and dress the edge smooth and flat. A small guide either commercial or shop made (a chunk of 2X4 with a slot to hold the file) in order to hold the file at 90 degrees is a good help, but not necessarily required. You can use the same guide you use for jointing the teeth of your saws


If shop made (chunk of 2X4) you can also easily use your jig to help you hold the scraper straight while honing the edge at 90 degrees on your stones


SHARPENING SAWS

You need a saw vice, either commercial or shop made, to hold your saw plate steady while filing, a good set of triangular files to sharpen them and a suitable saw set.

A few of my antique saw vises From L-R
Sargent No 103, Unmarked, Disston No 1

Some of my sawsets, as you can see they comes in a wide variety. 
I would recommend a pistol type such as 
the Stanley 42 or Eclipse (second from Left top)

A good set of triangular files, sized to your saws tooth line.
You want the file to be twice as big as the tooth depth in order to get to use both sides of the file, which would give you 6 sides versus only three.  

You can add, a black marker (much easier than the old timey method of using a candle smoke to darken the teeth) and a good light source, a magnifier glass is also very handy.

MISCELLANEOUS

Other useful things to add would be some sort of angle checker, strong magnification and light (think those lighted magnifier bench lamp)


If you are starting with sand paper, and I highly recommend it before settling on a stones system, keep in mind that in the long run, it is not inexpensive since you are gonna go through lots of paper. Do the math and you will realize that it adds up quickly... But it is very convenient, portable and accessible anywhere you are, handy.
When rehabbing old cutters I always start with sandpapers before I finish with my stones, to avoid unnecessary wear and tear on my precious stones.

There are all kinds of jigs you can build such as Ralph's Molding iron jig


There are all kinds of specially shaped files, hones and etc to help you get into the nooks and cranny's of various moulding profile irons or carving tools.
Buy them as you have a need for them.

You can easily cut the profile of the cutters, using the actual tool, on a piece of wood then rub some honing compound into it to strop your profiled cutters.

Do not dred sharpening, it may be a necessary evil, but it is a crucial skill you need to develop early on in order to enjoy your woodworking. There is nothing more frustrating, and often dangerous, than using a dull tool! So buckle up and learn to sharpen your tools...

Bob, sharpening his mind with cold beverages :-)

Introducing a new hammer for this century.

$
0
0
It took a long time, don't know why it took so long, it was such an obvious evolutionary thing to do...

But here it is, finally! Introducing the Can't Miss No More V2.153A26  ,  21st Century hammer.
That's right thanks to its built in laser, you have no excuse to bang your fingers no more! Suddenly, hammering away becomes a child play.

A good example of a good time to use one of our cutting edge hammer
Pic from Claude Serre's album  Le bricolage, France Loisirs 1984

Disclaimers for the OSHA police and as required by morons who like to sue others:
- Not suitable for young children under the age of 3 years old, their little hands are still too small.
- Not suitable for driving screws, so don't even try. You could however use it to bash cheap (or is that cheep :-) Robertson's  imitations.
- Repeated usage can cause deafness or blindness and in extreme cases, even death, but don't let that scare you, it is just the usual cautionary tales (?)
- Leave in your spouse's hands at your own risks. Refer to previous warning. Especially when she found out how much you pay for this piece of... fine engineering.
- Do not operate hammer when under the influence of any intoxicating agents or giggling uncontrollably. If you see two beams, you may hit your hands if you look at the wrong beam.
- Do not look directly into the beam, there is nothing to see but nothingness, go get a life instead.
- Contains lead acid battery, swallow at your own risks... If you must...
- Caution hammers have been known to fly off the handle without any warnings, approach and handle with care.
- Hitting fingers repetitively is not a substitute for proper pain control, although it WILL make you forget about that other pain you had inflicted earlier when the hammer struck your head.

Cutting edge Tool's development and testing 
can gives you headache too

- Always read and forget all instructions that came with your new tool, if you cannot operate a hammer, perhaps you should try something less taxing...
- And don't forget to wear these important piece of safety equipment's:
Safety blindfold and kevlar open-toes sandals

OK with all the required legalized stuff out of the way, lets get into it.

Your new to you hammer comes with a rubber clown handle which is guaranteed not to break... ? Go ahead, just try, I dare you!
(Warranty void if broke)

To turn on the laser, push, pull, slide, lift, snap down the switch. Swearing a little has been reported to help to turn the %#$@& thing on.
No need to turn it off, it will do so automatically upon impact.

Before using for the first time, you should calibrate your laser pointer.
Notice where the dot is pointing and try to hit it. Hours of fun for you and your cats. You may required some adjustments to get it just right. The industrial grade duct tape provided to attach your pointer to the hammer is removable to help adjust the aim of it. Try not to get it stuck to your fingers, it is very sticky, in fact it can be used as a waxing substitute. But try on someone else first...  
  

Behold the hammer of the 21st Century


Some assembly required...
Inside the box you will find: Hammer head, laser pointer, piece of real "rubber" wood, piece of hi-tech sticky shit, glue, band aids and unreadable instructions. (Bottle of Aspirins not included).

In addition some or all of these tools may be required to put it together.

Some of the tools you will need

Oh, and one of those. Whatever that is...

Don't forget to memorized the 911 phone number for your area and put it on speed dial before starting.

Calibration could not be easier. Just aim the beam and try to whack the red beam. You may ask cats for advice on how best to proceed.

Our product testers hard at work

You could check with your dog but chance are, he will just take off with it to chew on it.... just saying.

HINT: Experience in the game of Whack-A-Mole would be an asset

Training accessories not included 
but available for large sums of money

Once calibrated, your hammering days just got easier and your bank account lighter. What more could you ask?

POWER REQUIREMENTS

Note that this model, due to the sophisticated onboard circuitry, is not cordless.
Indeed, you must supply a source of 550 Volts 3 phases, 50A and a suitable receptacle for our "one of a kind", can't find it anywhere else, plug.
(Available separately for a ransom price)

CAUTION
Hi-Voltage tickle. There, you been warned! Do not operate while Taking a bath. It would really tickle...

We have a cordless model in the work, but we have a few issues left to work out prior to a release of the product.

We have an unexplained high failure rate on the solar cell, 
which power the onboard Telsa Hi-Voltage generator.

To purchase this products and other bright ideas just send cash in an envelope...
How much you ask? Just stuff the envelope and seal properly.

Send To:

Hair's brain 21st century products
1 April Dr.
Suckertown
Olda Scotia
Kanada
HAH AHA

Oh, and YES, Happy April fool's day :-)
No 2 in an ongoing series

Bob, trying to keep his moral up

Recents happenings

$
0
0
Every-times we have a chance we introduced Rudy to other family pets.
This time it was three of his cousin's dogs who also happened to be service dogs.
They are trained to go in hospital and visits with seniors, vets and hospitalized people. Hopefully Rudy learned a things or two from them and did not gave them any bad habits :-)

From top L-R
Chuck, Rudy, Lady and Foster.

Foster is a 17 year old dog who is now blind but still an effective 
service dog in demand.

Friday during my respite care time off, I did my usual quick scan of my locals antiques places looking for tools. The picking is getting slim, hummm I wonder why :-) Nonetheless I managed to find a few interesting things.

A small chisel, a very small screwdriver and a small saw jointer.
Total outlay, less than $20, not bad, especially since these came from antique dealers.

The small jointer is marked SDA Co No 205
That would be Shurley Dietrich Atkins (after 1931) 

Found these pics from an EBay listings. 
Too bad the seller did not scan the whole instruction sheet 

So apparently these were painted blue when new.
I've seen enough of them on line to confirm that. 

A quick clean up of the chisel with sand paper and WD40.

That is how small it really is, I will turn it into a small paring chisel 
as it is also on the thin side, about 1/8 in thick.
 Did not found any markings on it.

Obviously a Metric chisel it measured 12 mm.

Not quite a 1/2 in, so must be European

There is still pitting to go thru on the back 
before it can be properly sharpen.

Once cleaned up I found markings on the screwdriver:
DARAIKE GERMANY

A quick google search turns up that, these tools were distributed by an American named Damon Raike and his tools were made in Germany. Roughly 1910-1922.
Tariff legislation's (buy American) killed his business in 1922.
It is really a very small screwdriver and well made.

The tip measure 3/8 in wide and is just the right size for the screws 
on my small S.D.A. Maple Leaf Web saw jointer No 205.
What a happy coincidence :-)

Also made some progress on rehabilitating our youngest son table lamps that I made many years ago from recycled Lightning arrestor (or more like Lightning attractor if you asked me :-) These came from our century old house were the kids grew up.
The original base I made was too small and light so I added a bigger base in Oak to match the original. I mitered four pieces of roughly 1 in thick, it really add weight, and it also leave an opening under to add more weight if required. 

Modified lamps base.

I'm hoping to finish them before his birthday on the 6th of this month.
All I need is "some" free time to get it done... Easier said than done ...

Gotta go, someones wants to play ball...

Rudy turned 9 months old on Mar 15th

Bob, making slow progress.

Beam boring machine, initial assessment

$
0
0
You may recall a recent picture of such a machine in a previous blog entry.
I was not sure if it was complete, beside the obvious missing boring bit, so I researched it on line and discovered that what they were asking, at 1/2 price sale no less, was quite a good deal, so.... It followed me home later on... Honest :-)

Notice the empty dado on the top cross member, 
that is where the holding clip would have been.

The only missing bit I can figured out is the clip on top to hold the carriage up, but someone long ago replaced it by a small piece of metal that you simply turn to hold it or release it. It work, so why re-invent the wheel... for now.

The Jerry-rig holding tourniquet.

Notice the empty dado where the holding clip would have been,
The gear in the middle slides to the left to engage the track to raise the carrier.


This is what I think the holding bracket would have looked like.
Its advantage would be that as the carriage is cranked up, 
it would snap in place to park it up without any intervention.
Once positioned to drill just push on the bottom of the clip 
to release the carriage 

Other than that, everything is accounted for, the gearing turns, albeit a tad sticky, and the carriage return gear slides in and out as expected.
The wood works need a good cleaning and I will probably put on some sort of finish on it to protect it, there is some play in the joint where the uprights are fastened to the bottom boards, will have to investigate and correct. The whole assembly is mounted by long thru bolts so I suspect there could be some dry rot causing problems, no big deal, I have the technology :-)

So, all I have to do now is to disassemble it, clean it, paint the metal work and lubricate the gearing and bushings.

The screw heads were covered in goop, 
probably dry up grease of some sort

All bushing covers removed, look good.
No pitting or galling on the shafts under the bushings  

One of the metal tracks on the sides, where the carriage slides up & down, 
has a small bow on it. It does make the carriage a tad stiffer when going over.
Easy fix that I would have to do. All the metal bits are to be stripped from the wood frame anyway.

The hardest part could be to find a suitable bit for it. I found some on line but they are asking way more than I paid for the machine ... :-(

But fear not, I think I can jury rig something, will see.

The business end of the chuck, just a a round opening 
with a big set screw on the side

A regular brace bit does not fit because of the square tapered tang.
Cutting it off, it would still be too loose for the hole size.

Got this twist bit with the right diameter shank and a flat spot, look perfect.

An indeed it fit great, so now I know the diameter I need.
These beam boring bits also have a long length to them 12 to 17 in long.
My regular bits are a "bit" on the short side.

My tape measure says 1/2 inch

But my drill bit gauge says it is bigger 
by a smidgen, guessing 9/16 in

Meanwhile, investigating the frame, found why the upright are a bit loose.

The bolts do not go all the way through but are captured 
in a nut on the side piece

Except that on both sides, a bolt is missing!

The fun part would be to find suitable square head bolts and nuts.
You can see some rot has taken places under the frame which is to be expected as these are often found laying in a barn on the floor or on a cement floor even, both would eventually results in this kind of problems. No big deal.  I want to keep it as original as possible, so I will solidify the punky areas with liquid PC-Petrifier.

The bottle of PC-Petrifier in the background is some sort of liquid epoxy (?) that penetrate the wood fibers and solidify them. Unlike regular epoxy, it is very liquid, almost like water and penetrate deep. I used that a lot in old home restorations with good success.

That PC-Petrifier does not alter the wood surface other than impart a semi gloss to the area. I usually remove as much punky wood as I can, then saturate the area with it to prevent further rot and ensure I have a solid foundation to epoxy glue in pieces of wood that I later shape to blend in the repairs. Normally it would be painted over, but in this case I want to preserve as much as I can the original wood, so unless pretty punky (does not seem to be yet) I will just treat the bottom with it before applying some protective clear finish over the whole wood work.
I want a low sheen, not glossy.

The metal parts I will take apart and derust them, assess the paint condition on it (look like it was Japanned?) and probably repaint it black.

My goal being, I want the final product to retain its old look but be a working tool. As for lubrication of the gears and shafts, don't know yet what I'll use. I seen most people on YouTube used WD-40, but I'm thinking something better lasting like a grease of some sort. White Lithium perhaps? Will have a
look at what I have in the garage...
But at any rate, one should always open the bushings, clean, inspect and lubricate them when first acquired.

End of boring part 1 :-)

Bob, who got another side distractions on the go, but must finish lamps first...


Lighting arrestor's table light

$
0
0
Back in the late 90s, I made a pair of these from parts of our old farm house for our younger son, Matt. The base was a bit small and light, so they were a bit easy to tip, being tall. Time for an update.

To add weight and stability, I made a new wider bottom part from 1 inch thick oak.
I was not sure if that would add enough stability, so I made provision to add weight if needed.

I did that by making the wider base part from 4 mitered pieces, leaving an empty space in the middle. I figured I could add piece of tiles or whatever else I had on hand that would do the trick.
My first thought was lead, but we all know that would make them heavy for sure, but also unsafe...

The corners are mitered and re-enforced by a biscuit.
Judging by Rudy's face, I did those a few months ago :-)

Both pieces screwed from the bottom.

Then after sanding, sprayed painted


I'm also hedging my bets by changing the lamp shades by smaller ones, in a bid to make them less tippy.

And while I was rejuvening them, I decided to add some hi tech lighting to them :-)
Bought a pair of Homebrite smart LED bulbs, controllable via smartphones using Bluetooth V4 technology. 800 lumens using 9 watts each for a 60 W equivalent bulb. Total 120 Watts equivalent light output for a mere 18 Watts, gotta like it :-)


The wooden bases are made of oak, the lighting rod holders are brass, the rods copper and the insulator, molded white glass.

Somebody is trying to help me this morning with my project...
Now if only I could find where he put the bag of screws I had for them...

The rods and holders are verdigris from years of being on top of our house. So did they do their job protecting our house?
Debatable, we got hit twice and never again after I took them down...
Hence why we gave them the nickname "lighting attractors" :-)

Me and Heather and our critters standing in front 
of our 150+ years old farm house, mid 90s.
My brand new "was to be retirement" workshop in the background.

The last time we got hit, mid 80s, we dutifully unplugged electronics to protect them before the storm.
The lighting bolt jump off the power receptacle and hit the stereo cables from our brand new Panasonic portable VCR (PV6500K) to our older stereo. And where did it go? To the new VCR of course and totally destroyed the audio outputs. I rebuilt it, but could never get rid of a low background hum grrrr.

That's when we decided to take them down...

Years later we sold the house and moved to Ottawa. A small part of the house where the kids grew up went on to live as table lamps, and now they have been rejuvenated and brought into the 21st century.

Our son Matt being presented with his certificate of appreciation from the RCAF in recognition of the important support, family members make to an effective Air Force, at my retirement ceremony. Strong family support is what enables us to do our job without worrying too much while deployed.


So after two trips to the hardware store, strip a brass screw, replaced and replace one socket/switch assembly, could not find the bag of parts that the dog took off with, and last minutes paint touch ups... Got it done with hours to spare, phewwww :-)

This socket has a kaput switch, to be replaced

Lightning rod was cut and a section of thread rod was steel epoxy glued, 
with a nut to prevent the exposed thread to be pushed in.
That was done more than 20 years ago, so I'll say it's holding pretty good.

Detail how the glass insulator is held on the quad legs assembly 

Modified base. Much more sturdy and no longer tippy
Yes the lighting rod is inverted. 

The pairs of lamp re-united, and yes, 
they are Asymmetrical :-) 


Happy 37th birthday Matt.

Bob, still looking for that bag that Ruddy took off with??

Small improvement to the Ensuite bathroom

$
0
0
A few years ago when we remodeled the main bathroom we tried one of those new Comfort height also called Right height toilet.
What is the difference? Our standard toilets have the rim of the bowl at a height of 14-1/2 in, the comfort ones stand at 16-1/2 inches height.
By the time you add the toilet seat, you are now seating at a comfortable chair's height.

That 2 inches makes a big difference in ease of seating and getting up after.
Once you get used to it, it feel like the regular ones are much lower...

With Heather mobility getting restricted more and more, it was time to put one in the Ensuite bathroom to help her out.

So guess what I did this Week-End?....

The original toilet.

Out with the old...

In with the new...

From start to finish it only took me half an hour. And that included chasing Rudy to get some parts back. He was banned from the room after :-)
I was pleasantly surprised by the completeness and quality of the components includes in this "All in one" toilet kit from American Standard, nothing else to buy. The instructions even says no tools required... Yes, that is true because they furnish a special plastic nut driver for the tank to bowl connections and also the toilet seat bolts, clever. Everything else is easy to grip for a snug finger tight connections. No leaks on first try, bonus :-)

This is what the Ensuite looked like at purchase time...

As bought. Behind the curtain is a space for the plumbing and storage 
since the shower enclosure is pushed far to the left.

The place was totally gutted to the studs, removed traces of mildew and made the room water and mildew proof by using cement boards for the walls.

The floor redone

The window replaced

New sink and mirror, light fixture

New shower enclosure and relocated to the right


The only thing I was worried when I remodeled this space was the space between the shower enclosure and the toilet. This is a rather small space and it had to fit. I went with a neo shaped enclosure and the door open to the left, and I re-used the original toilet which had a round bowl. I prefer elongated bowl (like in the main bathroom) but was worried about space.

Found a round bowl comfort height toilet so that is what I put in, good thing I did not used an elongated one because I still managed to loose about 1-1/2 in of space, would have been a few more inches if elongated.

The plan at the time was to remodeled this Ensuite bathroom before tackling the main bathroom. 

Original main bathroom

Entry door was relocated to the left. I would have never been able to 
contortioned the big soaker bath into this space if I did not do that first. 
And now it is a lot easier to wheel her in and out of the bathroom also. 

The new one. 61 in walnut vanity, granite counter top with two under mount sinks. New soaker tub, shower fixtures etc. in a tiled enclosure.

New hi efficiency comfort height toilet with electronic bidet, 
its remote is on the countertop.

The floor has a Ditra membrane  and Kerdi membrane on the tiled walls. Everything is sealed and waterproofed, meaning I don't ever expect mold down the road...
Once both were done, I then remodeled the one downstairs in my man cave.

Original man cave bathroom

Remodeled man cave bathroom.
The oval medicine cabinet/mirror in the wall was recycled 
from the Ensuite bathroom


All three bathrooms in the house have been brought into the 21st century, one at a time. Similarly the kitchen was also remodeled extensively. We are pretty well done with all the renovations we had planned into this house. We had contemplated moving one more time, but it is obviously not going to happened anytime soon. And I don't foresee moving after she is gone :-(

Bob, trying to make it easier for Heather.

Viewing all 377 articles
Browse latest View live